Access to collections and datasets are controlled through the Permissions function, which uses preset Roles. Roles can be assigned at the collection, dataset, or file level. Once assigned, that role applies to all collections and datasets in the hierarchy below the location where the role was assigned. In other words, if a role is assigned to at the collection level, that role is applicable for all datasets contained within that collection.
Permissions can be assigned or removed by users with the role of Admin, Contributor Plus, or Curator in the system. In general, your institutional support contact(s) can change the permissions for all collections and datasets within their institutional collection. If you have any issues with adding or removing roles, or if you have any questions, please contact your institution for assistance.
Roles
Borealis has preset roles that are available for assignment in any collection or dataset. A single user can be assigned one or more of these roles.
Each institutional collection has been set up with default roles that are assigned upon the creation of a collection or dataset. These permissions restrict who is permitted to create a new collection or dataset within an institutional collection. These defaults are controlled by your institutional support contact(s).
List of Roles
The following lists all the default roles available for selection in the collection and what tasks each role is allowed to perform. These roles can be assigned to individual users or user groups, and more than one role can be assigned.
- Admin:
- The Admin role allows users to add, view, and approve unpublished and published collections, datasets, and files. An Admin can also manage and edit metadata and permissions for collections, datasets, and files.
- Curator:
- The Curator role allows users to upload and edit files, add and edit metadata, edit the Terms of Use, enable a Guestbook, restrict files, edit and assign permissions and roles, and publish datasets.
- Contributor and Contributor Plus:
- The Contributor role allows users to upload and edit files, add and edit metadata, edit the Terms of Use, and enable a Guestbook within an individual dataset.
- A Contributor Plus is a global custom role that can also manage dataset permissions and submit for review a draft dataset for review by administrators, but cannot publish datasets.
- Dataset Creator:
- The Dataset Creator role allows users to add datasets within a collection. The role assigned to the user for the created dataset depends on the collection permissions.
- Dataverse + Dataset Creator:
- The Dataverse + Dataset Creator role allows users to create sub-collections and datasets within a collection. Users automatically become admins for the collections that they create. The role assigned to the user for the created dataset in the parent collection depends on the collection permissions.
- Dataverse Creator:
- The Dataverse Creator role allows users to add sub-collections to a collection. Users automatically become admins for the collections that they create.
- File Downloader:
- The File Downloader role allows users to download all files, including restricted and unpublished files.
- Member:
- The Member role allows users to download published files and view unpublished collections and datasets.
Checking Roles You Were Assigned
- Log in.
- Click on your name in the top, right corner of the screen and select My Data from the drop-down menu.
- A list of collections and datasets will appear. The items listed are only those for which you’ve been assigned a specific role.
- Locate the collection or dataset you wish to check in the list that appears.
- Review the name of the Role indicated beside the collection or dataset name in light blue.
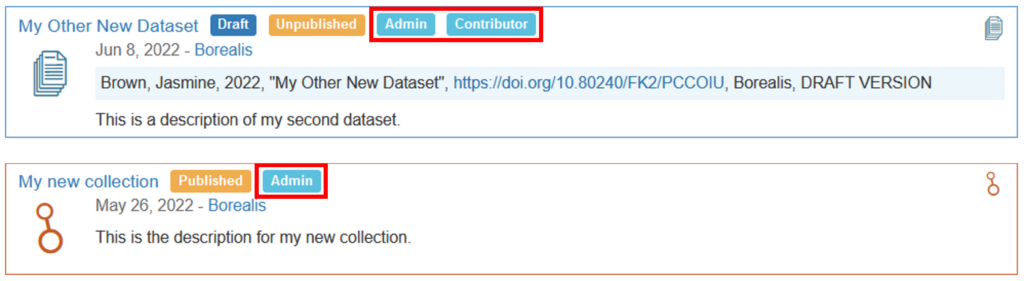
- In the above example, the user has the Admin role for the collection titled My New Collection and the Admin and Contributor roles for the dataset titled My Other New Dataset.
- This list also includes other indicators in dark blue, orange, and red.
- A collection or dataset that is in Draft format will be indicated in dark blue (as in the dataset listed in the example above).
- A dataset that has been deaccessioned will be indicated in red (example not included).
- The publication status of a collection or dataset will be indicated in orange as either “Published” or “Unpublished” (as in the example above).
Groups
Groups can be used to assign roles or permissions to multiple users at the same time. Instead of assigning multiple users roles within a collection or dataset, you can use a group. You can also create a group of other groups.
Groups are beneficial in many ways. One example is if you have a project team who all need the same type of access to your data, but the members of that team change on a regular basis. Instead of adding and deleting users from each collection or dataset, you can make one project team group that contains all the members. When the team changes, you update the group once and it automatically updates the access to all the collections and datasets for which that group is assigned.
Creating a Group
Note: Users need to have an Admin role in order to edit and change Groups.
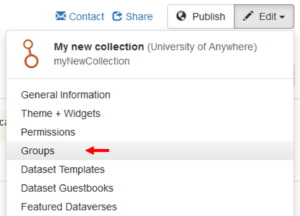
Open the collection for which you want to create a group. The group needs to be created at a collection level, but can be applied to any collection or dataset under that level.
- Click on the Edit button in the top right corner and select the Groups option from the drop-down menu.
- Click the Create Group button in the top right corner of the screen.

- Enter the name of the group you want to create in the Group Name field.
- Enter an identifier for the group in the Group Identifier field.
- The identifier is a short-form of the name that doesn’t include any spaces.
- Identifiers can only include letters, numbers, underscores, and dashes.
- Enter a description for your group in the Description field.
- Enter the names of the other groups or the users you want to add to this group in the Users/Groups field.
- As you type, the field acts like a search box and will display users with that name.
- Once you see the user or the group appear in the list, click on that name.
- You can add as many users and/or groups as you want in this field.
- Click the Create Group button at the bottom of the page to create the group.
- The Group page will reload with a green success message at the top of the screen.
- Click to refresh the screen in order to see your new group listed on the page.

- Groups are automatically assigned a Group ID that starts with the prefix: “&explicit/”.
- The forward slash (/) is followed by a 5-digit number that represents that ID for the collection in which the group was created.
- The Group Identifier you selected in step 5 will appear in the Group ID at the end.
Collection Permissions
Note: Users need to have an Admin role in order to edit and change collection permissions.
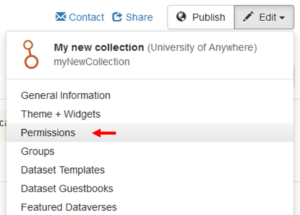
- Open the collection for which you want to change permissions.
- Click the Edit button and select Permissions from the drop-down list.
- The Edit button will only be visible if you have been assigned as an administrator for the collection.
- The Permissions page is divided into three sections: Permissions, Users/Groups, and Roles.

- Permissions are inherited from the parent collection into sub-collections at the point of sub-collection creation.
- Changes to collection permissions will be applied to all datasets located within it.
- Changes to collection permissions will not be applied to previously created sub-collections.
Updating Permissions
The Permissions section contains two settings:
- Who is able to add to this collection, and
- When a user adds a new dataset to this collection, which role should be automatically assigned on that dataset.
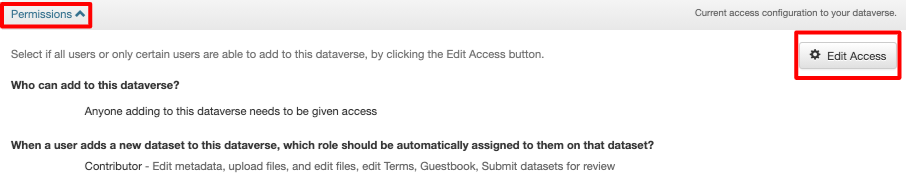
- To change one or both of these Permissions settings, click the Edit Access button on the right side.
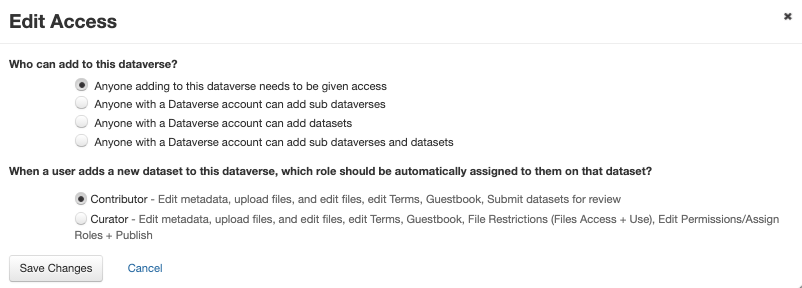
- To change who is able to add to this collection, click on one of the radio buttons within this section.
- Anyone adding to this dataverse needs to be given access—you or another administrator have to assign the role to any users who want to add data to this collection. Roles will not be automatically assigned.
- Anyone with a Dataverse account can add sub-dataverses—anyone with an account is able to create a collection within this collection. This option would not allow users to add datasets within this collection, but they would be able to create datasets within any sub-collection that they create (users automatically become an admin on any sub-collection that they create).
- Anyone with a Dataverse account can add datasets—anyone with an account is able to create a dataset within this collection. This option would not allow users to add sub-collections.
- Anyone with a Dataverse account can add sub-dataverses and datasets—anyone with an account can create both sub-collections and datasets.
- To change the setting for “When a user adds a new dataset to this collection, which role should be automatically assigned on that dataset,” click on one of the radio buttons within this section.
- The Contributor role allows users to upload and edit files, add and edit metadata, edit the Terms of Use, and enable a Guestbook. A Contributor can also submit a draft dataset for review by administrators, but cannot publish datasets.
- The Curator role allows users to upload and edit files, add and edit metadata, edit the Terms of Use, enable a Guestbook, restrict files, edit and assign permissions and roles, and publish datasets. Warning: we do not recommend the Curator role as default as it provides an open deposit.
- Click the Save Changes button once you’ve made your selections.
Updating Users/Groups
The Users/Groups section lists all users and groups who have access to the collection, and the role they’ve each been assigned. Please note that when a user is given a role at the collection level, this role is applied to all datasets (and new sub-collections).

- Click the Remove Assigned Role button to delete an assigned role for a specific user or group.
- Click the Assign Roles to Users/Groups button to add a role to a specific user or group.

- Enter the user’s name or the group’s name in the Users/Groups field of the Assign Role window.
- When you start typing, options will appear in a drop-down menu from which you can select.
- Click the radio button beside the name of the Role you wish to assign to that user or group.
- While you can assign more than one role to a user or group, you will need to add each role separately.
- Definitions of each role, and what it allows a user to do, can be found on the previous screen.
- Click the Save Changes button to close the window and implement the changes.
Inherited Permissions
When removing or assigning permissions in a collection, keep the following in mind:
- Changes to Permissions will only affect that collection, datasets located within it, and new sub-collections. Existing sub-collections will not be affected by these changes. If you need to change the permissions for existing sub-collections, you will need to edit the permissions manually for each.
- Institutional support contacts may be assigned to your collections and/or datasets as administrators. Do not delete this access or the support contact(s) will no longer be able to see and assist with your collection or dataset if you need help.
Dataset Permissions
Note: Users need to have the role of Admin, Curator, or Contributor Plus in order to edit and change dataset permissions.
- On the dataset page, click the Edit Dataset button, select Permissions, then select Dataset from the drop-down menu.
- The Edit Dataset button will only be visible if you have a role that is allowed to edit datasets.
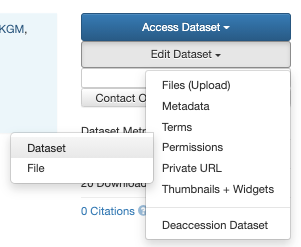
- The Edit Dataset button will only be visible if you have a role that is allowed to edit datasets.
- The Permissions page for datasets is divided into two sections: Users/Groups and Roles.
- The Users/Groups section functions exactly the same way as the same section at the collection level.
- The Roles section displays the same information as the same section at the collection level. However, at the dataset level, new roles cannot be created. Existing roles are listed for informational purposes only.
- To give permissions to your dataset for a new user or group, follow the steps in the Updating the Users/Groups section for collections.
- To remove permissions to your dataset, click the Remove Assigned Role button under the Action column for the user or group you wish to remove.
- Some users or groups may have multiple roles for a single dataset. If you want to completely remove access to your dataset from a user or group, make sure to carry out this step for each row that includes their name.
- Some of the users or groups may include the following note under the Action column, Role assigned at Collection. Users and groups with this note cannot be removed using dataset permissions, they can only be removed using the collection permissions.
