- Language Considerations
- Filename Conventions
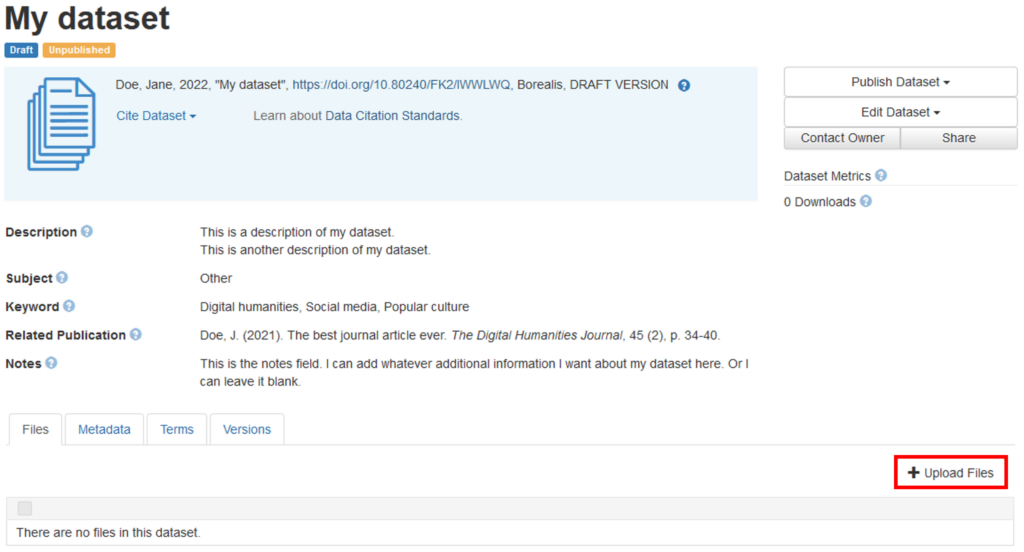
- Adding Files to a Dataset
- File Formats
- Encouraging Data Reuse
- File Size Limits
- Single File Limitations
- Compressed File Limitations
- Tabular File Limitations
- Batch File Uploads
- File Size Consideration
- Uploading Files to a Dataset
- Dragging and Dropping Files
- Select Files to Add Button
- Uploading from Dropbox
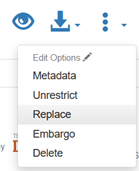
- Replacing Files in a Published Dataset
- Saving Uploaded Files
- GitHub Integration
- Entering Metadata and Restricting Access for Files
- Adding Metadata During File Upload
- Restricting Files
- Tabular Ingest
- Limitations of Ingesting Excel Files
- Tabular Ingest Errors
- Skip Tabular Ingest
- Uploading ZIP Files
- ZIP File Considerations
- Data Curation Tool
- File Hierarchies
Language Considerations
If your file names use characters with accents, such as é, ç, or ö, ensure that your file uses UTF-8 encoding, which is employed by the Dataverse software. If you upload a file that includes accented letters with a different encoding, the accents will be removed. You can use the Help feature in your software application for more information on changing the encoding of your file.
Filename Conventions
Filename conventions are key to making your data FAIR (easy to find and easy to understand). Such conventions can be determined during your project’s data management planning phase. The following are some tips on choosing a filename convention for your project.
Use short folder names and descriptive filenames:
This is especially important if you’re not including the file folder name or structure in your dataset. Users will not have folder names to help them decipher what may be contained in your files.
Avoid using symbols or punctuation:
Do not use the characters that appear above the numbers on your keyboard, or other types of punctuation as part of your filename (e.g., ! @ # $ ^ & * ( ) + = ~ . , ? `).
Do not use spaces:
Use an underscore (_), a hyphen (-), or capital letters to separate words or sections of your filename, not spaces.
e.g., Avoid “Project Name Survey Title Respondent Name Sept 2020.doc” → instead, use “ProjectName_SurveyTitle_RespondentName_Sept2020.doc” or “Project-Name_Survey-Title_Respondent-Name_Sept-2020.doc”.
Choose a consistent date format:
Order the elements of the data in chronological order: year, month, day (YYYY-MM-DD or YY-MM-DD). If you also need to include the time, also put it in chronological order: hours, minutes, seconds (HHMMSS).
e.g., Avoid “RespondentName_2020_Mar_16-2:00pm.doc” or “RespondentName_03_16_2020-2pm.doc” → instead use “RespondentName_2020-03-16-1400.doc”.
Use a consistent method of version control:
While Borealis will track different versions of a file uploaded to a published dataset, these versions are not reflected in the file’s name nor are they reflective of your version of the file. If you have multiple versions of the same file, keep track of the versions using a consistent format.
One suggested format is to use Vx-01 to Vx-99 for minor revisions and V1-xx to V9-xx for major revisions. You could also add words such as “Final” or “Draft” to further distinguish between major versions.
e.g., Use “ProjectName_JournalArticle_V1-03.doc” or “ProjectName_JournalArticle_V2-01.doc” or “ProjectName_JournalArticle_V3_Final.doc”.
Document the Filename Convention You’ve Used:
If you include documentation about your dataset as part of your upload (e.g., a READMe file), include a description of the filename convention you used.
Adding Files to a Dataset
You can add one or more files while creating a new dataset, before you click the Save Dataset button. Or, you can add files using the Upload Files button after the dataset has been created.
File Formats
Borealis supports the uploading of any file type, including (but not limited to) documents (PDF, DOCX, TXT, PPTX), images (JPG, PNG, TIFF), videos (MOV, MP4), audio (MP3, WAV), tabular files (XLSX, SAV, DTA, R, CSV, TSV, TAB), compressed files (ZIP), and many more.
Encouraging Data Reuse
One important aspect of data reusability and FAIR is the ability of a user to be able to open, view, and manipulate the file(s) — at any time, now and in the future. There are several things to consider regarding file formats: the standards and conventions within your discipline, how easy (or costly) it is to obtain the software required to open a file, and whether there’s a chance the format may become obsolete.
Files that can only be opened with expensive software (e.g. NVivo, SPSS, Stata, etc.) may prevent some users from being able to view or reuse your data. File formats that may become obsolete (e.g., WordPerfect, MS Works, etc.) may mean your file cannot be accessed in the future.
When selecting what file formats you want to use within your dataset, think about your ultimate objective for preserving and providing long-term access to your research data. If the goal is to make your research data available to other researchers for analysis or reuse, opt for file formats that will always be usable (e.g., comma- and tab-delimited files, plain text files, PDFs, etc.).
File Size Limits
Borealis has limitations on the size of the files you can upload.
Single File Limitations
When uploading a single file, that file cannot be larger than 5GB.
Compressed File Limitations
When uploading multiple files within a ZIP file, the Dataverse software unzips the file and places the individual files into your dataset. ZIP files with more than 1000 files will not be unzipped into individual files.
When uploading TAR files or double-zipped files, file compression and organization will be maintained.
Tabular File Limitations
When uploading a tabular file (e.g., XLSX, SAV, CSV, etc.), it’s recommended that the file not be larger than 500MB. When uploading a tabular file, the Dataverse software ingests and converts that file to one that can be used by any tabular software. It can only complete this conversion for files smaller than 500MB.
When the Dataverse software ingests and converts a tabular file, the output of that process (a .TAB file) will be saved alongside the original file and displayed within your dataset. The original file format can be downloaded by users if they’d prefer that version.
Only the first sheet within a spreadsheet file will be ingested and displayed in the .tab file. Additional sheets will not be included. The only way for a user to view all the sheets in your spreadsheet file is to download the original file format version.
One potential workaround for both of the above limitations is to create separate files for each sheet in your spreadsheet. If a file with only one sheet is still too large to be ingested, you could create a separate spreadsheet file for each time period within your data (e.g., by week, by month, by year, etc.).
To learn more about the tabular file ingest process, review the Advanced User Guide.
Batch File Uploads
If you have a lot of unzipped files to upload to your dataset and have experience with command-line tools, consider using the DVUploader to upload multiple files. While the same file size limitations apply, this tool can save you the time and effort required to add files via the website.
To learn more about the DVUploader, see the documentation on GitHub.
Please note that Borealis does not have rsync + SSH upload enabled.
File Size Consideration
One important aspect of data reusability and FAIR is the ability of a data user to obtain your files. Many countries, including Canada, have very slow internet connection speeds in some locations, or internet service providers may limit the amount of data that can be downloaded during a certain period of time. As such, a user located in one of these areas may find it difficult to download a large file from your dataset. Keep this in mind when organizing your datasets. Try to keep files as small as possible to allow any user the ability to access your files in the future.
The size of a file may also prevent some users from being able to process the file on their computers, based on processor speed or the amount of RAM. Computer equipment can become obsolete quickly and may also prevent a data user from being able to do anything with a file from your dataset, even if they were able to download it.
Uploading Files to a Dataset
There are three ways to add files to a dataset once on the upload screen: by dragging and dropping the files, by using the Select Files to Add button, or by uploading your files from Dropbox.
Dragging and Dropping Files
- Use the file explorer application on your computer and navigate to the files you’d like to upload.
- Click on one or more of the files you want to upload, then drag those files onto your web browser window and into the box that says Drag and drop files here.
- To highlight more than one file at a time, click on the first file, then hold down the Shift key as you click on the other files.
Select Files to Add Button
- Click on the Select Files to Add button on the file upload screen.
- Locate the files you want to upload and click the Open or Save button.
- To highlight more than one file, click on the first file, then hold down the Shift key as you click on the other files.
Uploading from Dropbox
- Click on the Upload from Dropbox button on the file upload screen. Login to your Dropbox account, if needed.
- Navigate through the files in your Dropbox folder, select the ones you want to upload, then click the Choose button.
Replacing Files in a Published Dataset
Once a dataset is published, the Edit > Replace feature can be used to update or revise existing files in the dataset. Replacing a file also generates a new dataset draft version, and this feature creates an explicit link between the previous and current versions of the dataset to track the history of the file across versions of the dataset.
Files with the same checksum, or algorithmically assigned identifier, may be uploaded to a single dataset. If you attempt to replace a file with a file that has the same MD5 checksum as another file in the dataset, a warning message will be displayed. If you attempt to replace a file with a file that has the same checksum, however, an error message will appear and the file will not be replaced.
Saving Uploaded Files
- Once you’ve started the upload of your files using one of the three above-noted methods, you may need to wait for a few seconds to over an hour. The speed of the upload will depend on a combination of your internet connection speed and the size of the files you’re uploading.
- If a file is taking too long to upload, or if you’ve changed your mind about the file, click the x button to the right of the progress bar to stop the upload.
- For small-sized files or for fast internet connections, you may not see the progress bar and x button at all.
- Review the list of files once they’ve all been uploaded.
- Go to the Entering Metadata and Restricting Access for Files section if you’d like to add more information about each file before you save them.
- If you’ve included a tabular file in your upload, review the Tabular Ingest section for more information on the additional processing.
- When ready, click the Save Changes button to finish the upload.
GitHub Integration
GitHub repository content can be uploaded to an existing Borealis dataset using a “GitHub Action” called the Dataverse Uploader Action. This integration provides a simplified way to backup your Github repository to a Borealis dataset. This customizable action can allow you to:
- Upload the entire GitHub repository or specific subdirectories
- Automatically synchronize at trigger events (e.g., push, release) or manually using the workflow dispatch event
- Turn on/off deleting dataset content before uploading from GitHub
- Turn on/off automatically publishing a new version of the dataset
To use the GitHub Action:
- Within your GitHub repository, create a YML file (i.e., workflow.yml) file within the directory called .github.workflows/
- Enter your configurations, such as the trigger events , and whether you would like to upload the entire repository (default) or specific subdirectories.
- Add your API token as a secret variable
- Input the server URL (e.g., https://borealisdata.ca, https://demo.borealisdata.ca) and dataset DOI (e.g., doi:xx.xxxx/xxx/xxxxxx)
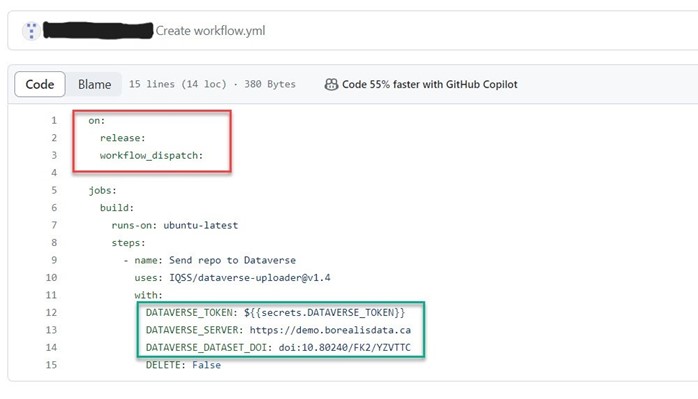
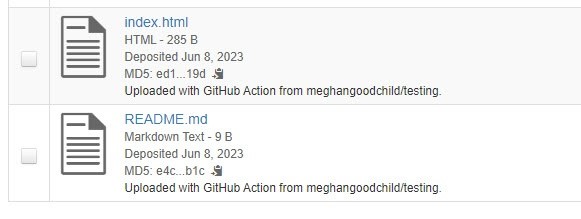
- After the GitHub action uploads the files to Borealis, you will see the files show up in the file list with file-level metadata “Uploaded with GitHub Action from” with the name of your repository appended.
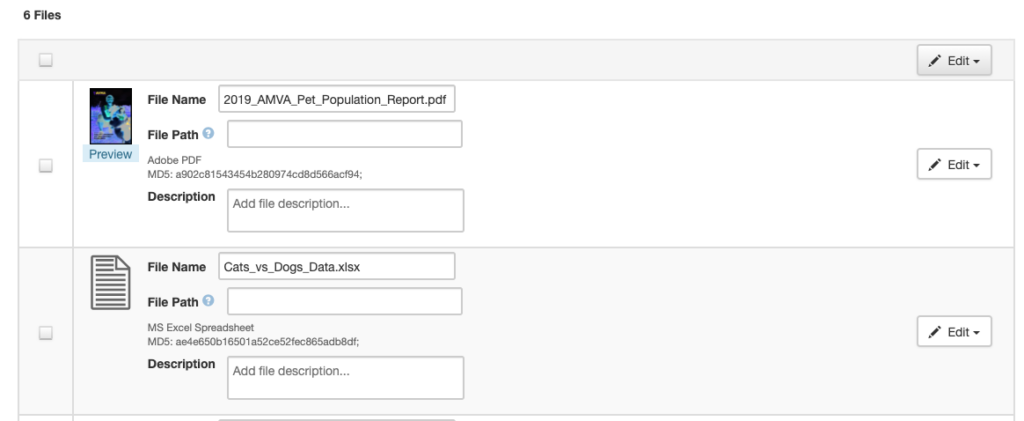
Entering Metadata and Restricting Access for Files
File-level metadata, such as filenames, paths, descriptions, provenance information, and tags, can be added to each file during the upload process. All of these metadata fields can also be added or edited after a file has been uploaded to a dataset. You can also restrict or unrestrict files at this point as described in the Restricting Files section below.
Adding Metadata During File Upload
After a file has been uploaded, and the upload progress bar has disappeared, information about each file is available at the bottom of the upload page. File-level metadata can be added at this point, before the Save Changes button is clicked.
- Edit the name of the file in the File Name field, if you’d like it to be different from the filename you uploaded.

- If you would like to organize your files within a hierarchy (which is similar to a folder structure you’d find on your computer), there are two options:
- Add metadata within the File Path field for each file to indicate where in the hierarchy the file is located (using the following format): [Level_1]/[Level_2]/Level_3]/…/[Level_x].
- You can also upload a ZIP file that contains a file structure or hierarchy, which will be retained in your dataset.
- Enter additional information about your file in the Description field.
- Click on the Edit button on the far right to edit either the tags or the provenance associated with the file.
- Go to step 5 if you want to edit provenance information.
- Go to step 6 if you want to edit the tags.
- For provenance information, follow the instructions on the page that appears.
- For more information on data provenance, refer to the Advanced User Guide.
- Provenance information must be entered for each file.
- If you’ve used a provenance capture tool to record the history of your file, you can upload the JSON file in the Provenance File section.
- If you do not have the associated JSON provenance file, you can enter a description of the history of your file in the Provenance Description field.
- Click the Continue button when done to save the provenance information for that file.
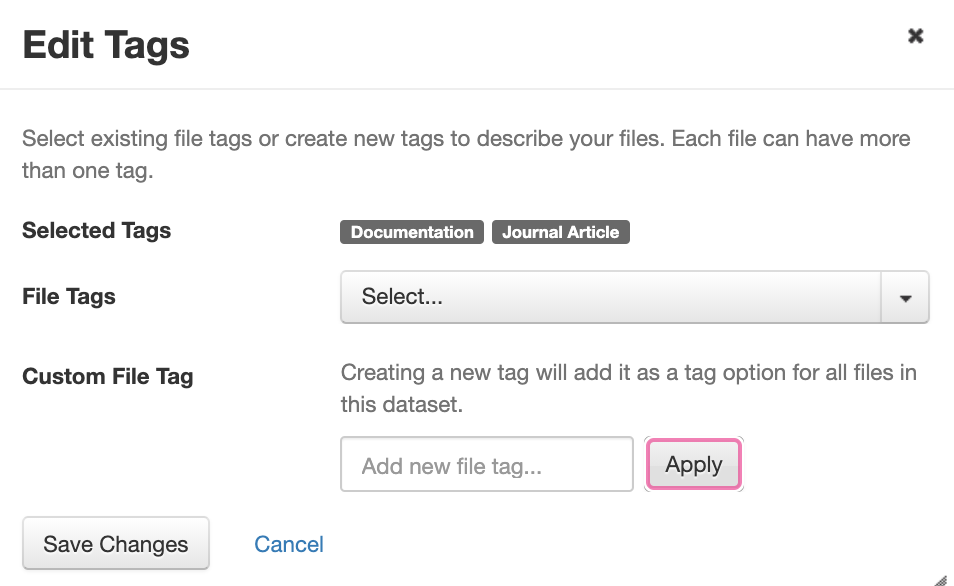
- For tags, you can either select one or more of the existing tags, or you can create your own custom tags.
- Check the box beside the existing tag names (Documentation, Data, or Code) in the File Tags drop-down menu, if you want to use one or more of them.
- Type the name of a new tag in the Custom File Tag field and click the Apply button to add that tag to the file.
- Each tag that is added to the file will appear within the Selected Tags section.
- Click the Save Changes button when you’re finished adding tags.
- Click the Save Changes button to save all the files, plus the additional metadata you entered, to your dataset.
Restricting Files
- To make one or more of the files you’re uploading restricted, start by checking the boxes beside the files to be restricted, then click the Edit button and select Restrict from the drop-down menu.

- In the File Restrictions window, enter information about who can access your file(s) and how they can obtain access in the Terms of Access field.
- Datasets with restricted files must have either a Terms of Access applied in the metadata or Access Requests enabled.
- Check the box beside Request Access if you’d like access requests to come through the Dataverse software. If you leave this unchecked, users will need to manually request access by either contacting someone directly (as per instructions in the Terms of Access field) or via the Contact Data Owner button.
- Click the Continue button to close the window.
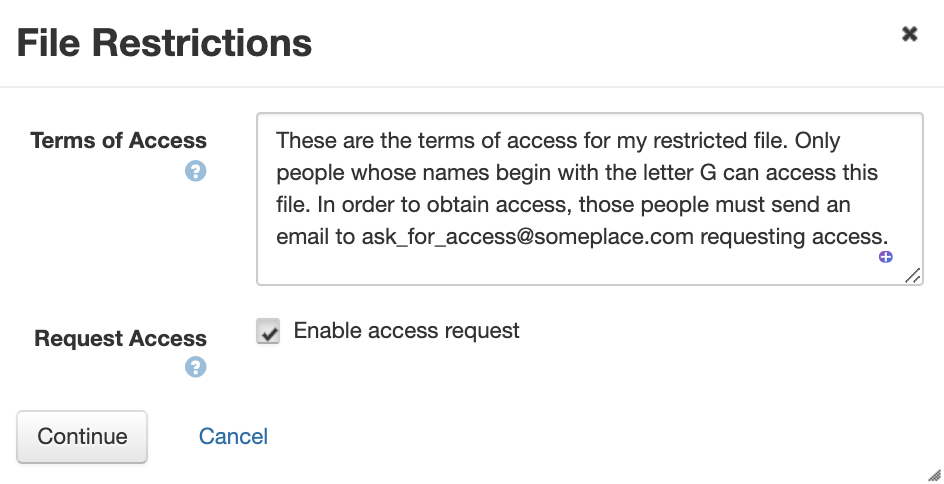
- Click Save Changes.
Tabular Ingest
If you upload tabular data (e.g., SPSS, STATA, RData, CSV, and Excel), the Dataverse software will undertake additional processing to ingest your tabular files and convert them to a tab-delimited file (.tab) that can be used by any tabular software. The tabular ingest process has a number of benefits, including the creation of a preservation-friendly non-proprietary file, an UNF checksum to verify the semantic content of the derivatives, and DDI variable-level metadata, which can be exported in a DDI-formatted HTML codebook. Tabular ingest also allows users to view the data with the Data Explorer, and enables editing of variable-level metadata with the Data Curation Tool.
Once you click the Save Changes button after uploading your files, you may see a green Success box or a yellow Dataset Locked box at the top of the screen. You may also see a blue progress bar that says Ingest in progress… beside the name of the file being processed.
While your tabular file is being processed, you will not be able to make changes to your dataset. The larger your file, the longer it will take to process. Once processing is complete, a green box will appear at the top of the screen indicating the file was ingested.
Once ingested, your tabular file will now appear in your dataset’s file list, similar to the image below. The file path, description, tags, provenance, and file restrictions are the same as they were during upload, but the file extension has been changed to “.tab”.

Limitations of Ingesting Excel Files
The ingest process will only process the first tab in a spreadsheet file. All other tabs will be ignored and will not be included in the tabular file that’s created. If you want all the tabs in a spreadsheet file to be converted to the TAB format, you’ll need to upload each tab as its own file.
The pre-ingested tabular file you uploaded is saved within the repository and is available for download. However, the download method may not be obvious to users. It may be helpful to add a comment in the file’s Description field explaining the format of the original file and that it’s available for download.
Tabular Ingest Errors
If you receive an error message while ingesting a tabular file, there are a couple of things you can try to fix the problem. However, you can also ignore the error message. Although the software was unable to complete the ingest process, your original file was still uploaded.
A caution icon will be displayed beside any file for which ingest failed. However, that symbol is only visible to you and other users who have access to make changes to your dataset.

Common ingest errors:
- Tabular data ingest failed. No rows of data found in the Excel (XLSX) file.
- When you download a Google Sheet as an Excel file, it uses the Office Open XML Spreadsheet format. This format is not understood by the Dataverse software’s ingest process.
- Use the Save As function in Excel to re-save the file as a .xlsx file, then re-upload the file and it should go through the ingest process without an error.
- The .tab file that is produced from the re-saved Excel file may not have an accurate number of rows (or observations) listed in Dataverse. When the file is re-saved, it may include a number of blank rows (or observations).
- Tabular data ingest failed. Reading mismatch, line x during second pass: y delimited values expected, z found.
- One possible reason for this issue is a line break being included in one of the cells. The error message will state on which row this line break occurs, so it can be corrected.
- Remove the line break from the row indicated, re-save and re-upload the file.
- If multiple rows have a line break, the ingest will continue to fail until all of them have been corrected. If you have a large file, you may want to reformat the file using formulas instead of making corrections manually.
- Tabular data ingest failed. Invalid header row. One of the cells is empty.
- This error is caused by a blank cell being included in the header row (row 1) between two cells with text. In a CSV, this means the header row has two consecutive commas: “text 1,text 2,text 3,,text 4,text 5”
- Enter text into the empty cell(s) in the header row, re-save and re-upload the file.
- If a comma was included in the text of a header cell title (e.g., This is a comma, in the header cell.), it can be left as is as long as the text is surrounded by quotation marks (e.g., “This is a comma, in the header cell.”).
- No error, but the file has a .gsheet or .numbers extension.
- The Dataverse software doesn’t ingest Google Sheet files (.gsheet) or Apple Numbers files (.numbers).
- The original version of the file will be listed in your dataset.
- Save the file in a different format to have it ingested.
If you have any other ingest problems, or are unable to resolve the issues noted above, please contact your institution. If you do not wish for your file to go through the tabular ingest process, contact Borealis support.
Skip Tabular Ingest
Users who deposit data using the Dataverse APIs can specify if they would like to skip the tabular ingest process during the upload process.
- To skip the tabular ingest process, add the parameter to the API call to set the tabular ingest to false (default is true)
- For more details, see the details in “Adding a file to a dataset” in the Advanced User Guide
Users can also request for tabular files to be uningested, meaning that only the original file type is displayed and available for download. Contact Borealis support for more information.
Uploading ZIP Files
ZIP (compressed) files can be uploaded to your dataset using the same method as any other file format. However, when the upload is complete, each file within the ZIP file will be listed, instead of a single ZIP file. The Dataverse software unzips the first layer of compression during the upload process.
ZIP File Considerations
If you want your ZIP file to maintain its compressed status while in your dataset, you’ll need to double-zip the file before you upload it. (This means you’ll first have to zip the individual files into a single ZIP file, then zip that ZIP file again. In essence, the file now has two layers of compression.)
The Dataverse software still unzips the file during upload, but it only unzips the first level of compression. The second level of compression is left as-is, and a ZIP file is displayed in your file list. Users can then download the ZIP file and unzip it on their own computers.
Users can preview the ZIP file within the browser and download individual files using the ZIP Previewer
Data Curation Tool
The Data Curation Tool allows users (admins, curators, and contributors) to create and edit variable-level metadata for tabular files (e.g., SPSS, R, Excel, CSV). The aims of this tool are to improve data curation workflow within the repository, to improve the ability for data reuse, and to support the application of standards and best practices using the Data Documentation Initiative (DDI) metadata standard.
To use the Data Curation Tool:
- Locate the tabular file you want to curate.
- There are two ways to open the Data Curation Tool for a file.
- Option 1: In the file list for your dataset, click on the File Options icon and select the Data Curation Tool.
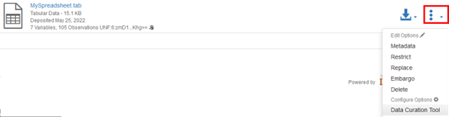
- Option 2: On the file’s page, click the Edit File button in the top right corner then select the Data Curation Tool.
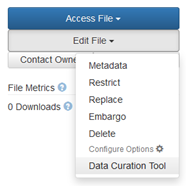
- Click Continue when prompted.
- A new tab will open in your browser in which the tabular file you selected is now displayed within the Data Curation Tool.

File Hierarchies
File hierarchies can be added to a dataset by adding a file path to the file’s metadata or by uploading a ZIP file in which the files are already organized within a hierarchy. The file path method, explained in the Entering Metadata and Restricting Access for Files section, requires you to manually enter the path for each file. The ZIP method does this configuration for you automatically.
When a ZIP file is uploaded to a dataset, it is automatically unzipped. If the contents of the ZIP file also includes folders, that structure is kept and added to the dataset.
As an example, we’ll upload the following ZIP file (with its structure and files) to a dataset.
ZIP File
- Documentation
- Journal Articles
- PDF File
- PDF File
- MS Word
- DOCX File
- Reports
- PDF File
- PDF File
- Journal Articles
- Images
- Set 1
- JPG File
- JPG File
- Set 2
- JPG File
- PNG File
- JPG File
- Set 1
- Spreadsheets
- XLSX File
On the Upload Files page (displayed below), after the ZIP file has been uploaded, you’ll see information included in the File Path field for each file. This text describes the path or location within the hierarchy that each file is to be located.
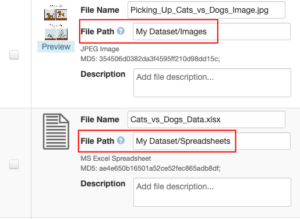
Once you save the changes on the Upload Files page, the files will be listed within the dataset. When viewing the dataset using the Table view, the files will be listed in alphabetical order. The File Path fields are visible for each file, under the file name.

To view the files within their hierarchy, click on the Tree button above the dataset search field.

The Tree or hierarchy view of the dataset lists the files within their folders and in the order they were listed in the ZIP file. While the Tree view shows the files in their hierarchy, unlike the Table view, it does not show any of the metadata associated with the files. You’ll need to click on each file to view its associated metadata.

If your full dataset is too large to upload in one ZIP file, upload multiple ZIP files with the same folder structure to ensure all files end up in the structure you want.