Creating a Collection
This section describes how to create a new collection within an institutional collection (i.e., create a sub-collection). However, each participating institution determines whether or not affiliated users are able to create sub-collections based on their institutional policies. Therefore, some functions outlined below may not be available to all users. Please refer to your institution’s policies and procedures or with your institution’s support contact(s) to determine which functions are available to you
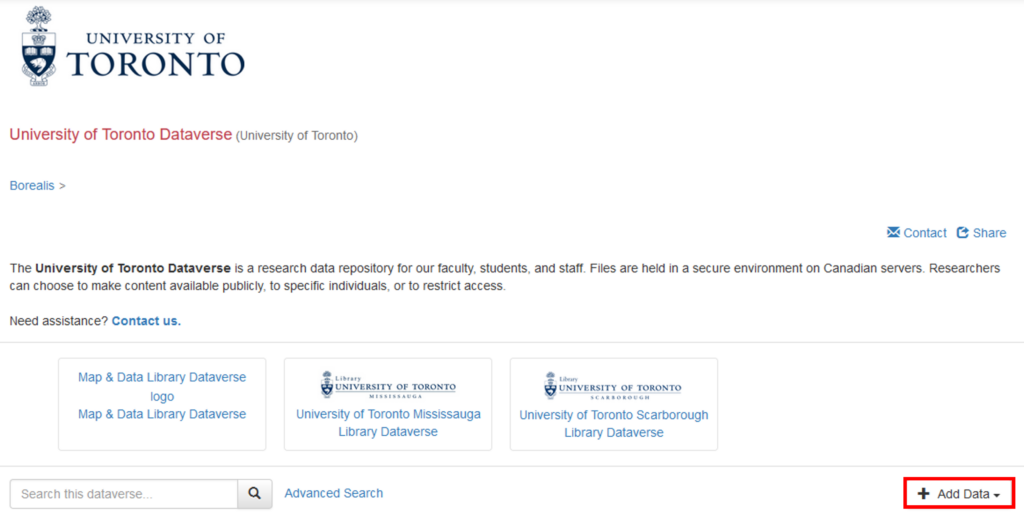
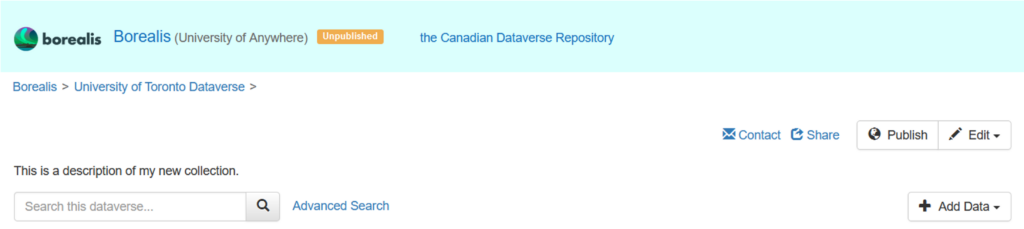
Once you’re logged in, navigate to your institutional collection to create a new collection.
- Click on the + Add Data button on the right side of your institutional collection’s main page and select New Dataverse.
- If you are not able to see “New Dataverse” you may not have permission to add a collection (see Creating a Collection above). Contact the administrator of the collection by clicking on the “Contact” icon in the institutional collection.
- If you are not able to see “New Dataverse” you may not have permission to add a collection (see Creating a Collection above). Contact the administrator of the collection by clicking on the “Contact” icon in the institutional collection.
- Enter information about your new collection in at least all the required fields (those with a red asterisk *).
- Hold your cursor over any of the question mark icons to see a description for that field.

- Hold your cursor over any of the question mark icons to see a description for that field.
- The Host Dataverse field is pre-populated with the name of the collection in which you’re creating this new collection. Tip: review the breadcrumbs outlining the hierarchy of the collections at the top of the page.
- Enter a name for your new collection in the Dataverse Name field.
- The Affiliation field is pre-populated with the name of your institution, based on your account information.
- Enter a short-form name of your collection in the Identifier field. Valid characters are a-Z, 0-9, ‘_’, and ‘-‘.
- Select the most appropriate option from the Category drop-down menu.
- The Email field is pre-populated with your email address, based on your account information. Click the + button beside the Email field to add more than one contact email address.
- Enter a description of your collection into the Description field.
- Select the Metadata Fields to use in dataset templates and select Browse/Search Facets for datasets and sub-collections for your new collection.
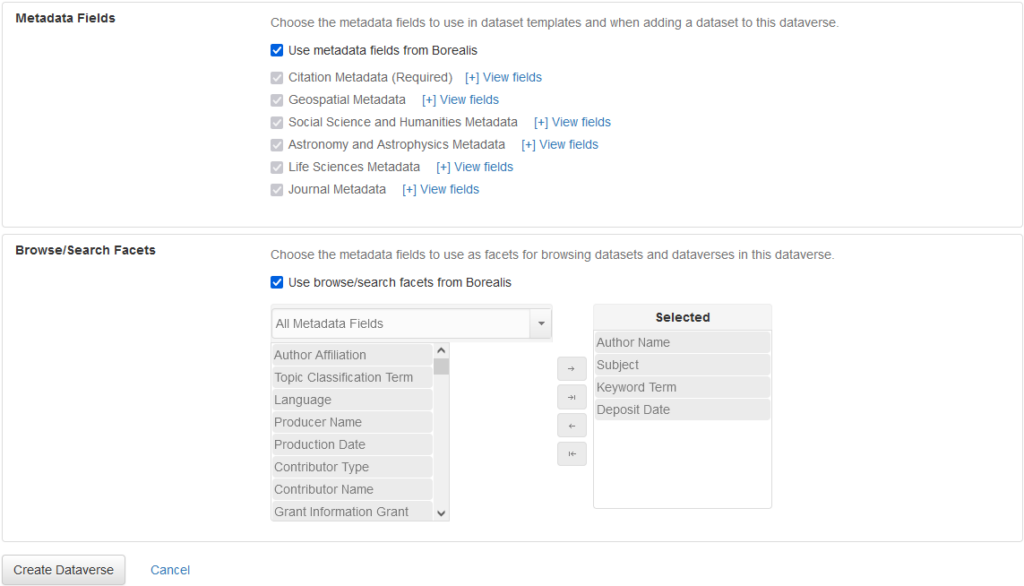
- For Metadata Fields:
- The default option is Use metadata fields from….
- At a minimum, you are required to include the Citation Metadata fields.
- Once selected, these metadata fields will be included for all datasets you add to your collection.
- You will be able to add and/or remove metadata fields later by editing your collection.
- Refer to the Dataverse North Metadata Best Practices Guide for more information on the best metadata fields to include for your new collection.
- For Browse/Search Facets:
- The default option is Use browse/search facets from…
- The default facets are Author Name, Subject, Keyword Term, Deposit Date, Time Period Covered Start, and Time Period Covered End. These fields can be used to filter datasets and files within your collection.
- Click the blue checkbox if you want to change the default Browse/Search Facets.
- Click the All Metadata Fields field to display a list of all possible metadata categories that can be included. Or keep the field as-is to display all possible metadata fields available for selection.
- Select the metadata fields you would like displayed.
- Click the Create Dataverse button at the bottom of the screen.
- For Metadata Fields:
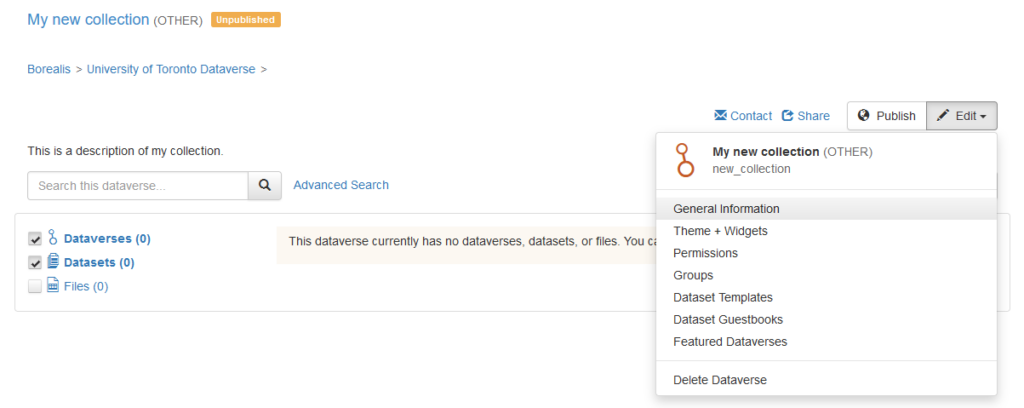
- Your collection will be unpublished, which means it would not be publicly accessible. Refer to the Publishing a Collection section for more information on how to publish a collection.
Editing a Collection
After you’ve created a new collection, you can edit information about that collection.
On the collection page, click the Edit button in the top right corner to open a drop-down list. More details about each option are described below.
General Information
Under the collection’s Edit > General Information menu, you can view and edit the information you entered when you created your collection. You can use this option to add new information (e.g., add a new field to the Browse/Search Facets), change existing information (e.g., update the Description), or remove existing information (e.g., specific metadata fields).
Once you’re finished making the changes you want, click the Save Changes button.
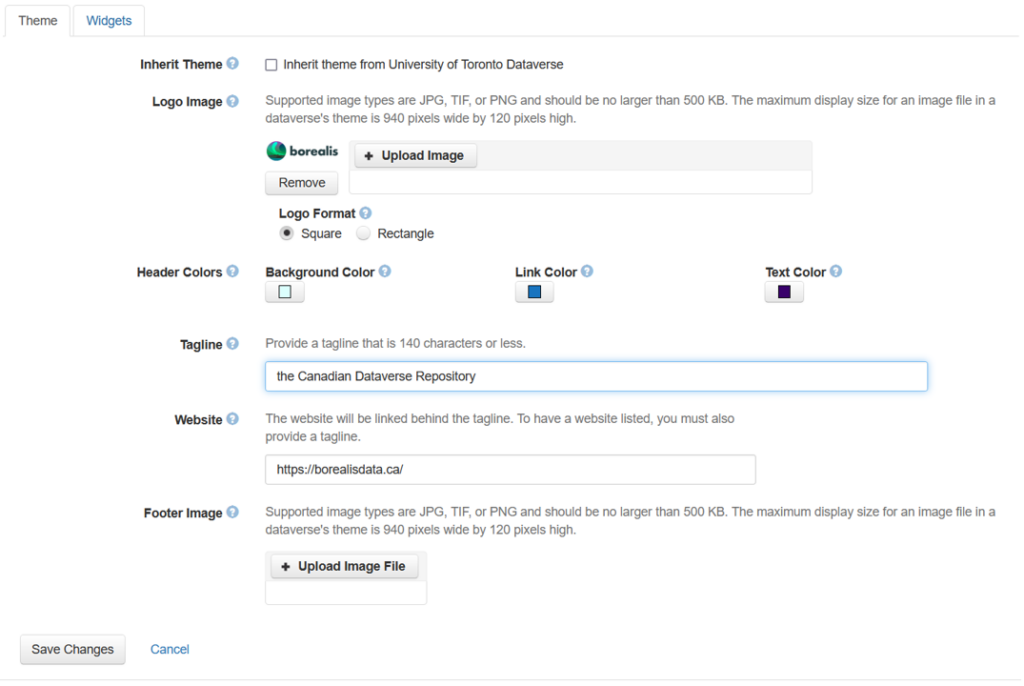
Themes and Widgets
Under the collection’s Edit > Themes + Widgets menu, the theme of a collection can be customized with the addition of a logo, text and background colours, taglines and websites, and a footer image. Every collection starts with a default theme, however you may want to customize your collection to better highlight the associated project.
When changing header colours, select colours that have good colour contrast for the best readability and accessibility. If you’re not sure, try testing your customized background colour with both the link and text colour in a tool for checking colour contrast.
Widgets can also be used for your collection. Widgets are HTML code you can add to another website that allows users to access your collection. Read more about using Widgets in the Advanced User Guide.
Permissions
Under the collection’s Edit > Permissions menu, you can edit the permissions for your collection. See Permissions for more details.
Dataset Templates
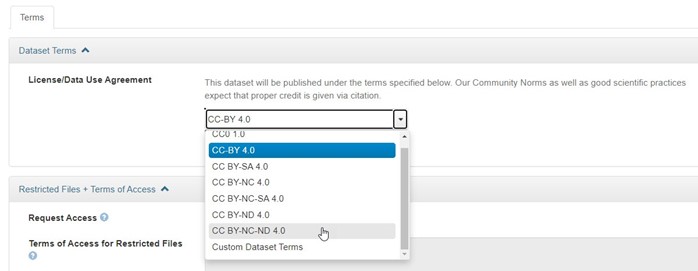
Under the collection’s Edit > Dataset Templates menu, administrators can manage the collection’s dataset templates, which are provided to assist users in applying a Creative Commons licence for data reuse or a custom licence to outline specific terms and conditions for reuse on a specific dataset. When you create a new dataset, you have the option to select one of the templates listed, which will pre-populate the form with the appropriate data licence. The current list of templates include:
- CC0 Public Domain (CCO 1.0)*
- CC Attribution 4.0 International (CC BY 4.0)
- CC Attribution-Non-Commercial 4.0 International (CC BY-NC 4.0)
- CC Attribution-NonCommercial-NoDerivatives 4.0 International (CC BY-NC-ND 4.0)
- CC Attribution-NonCommercial-ShareAlike 4.0 International (CC BY-NC-SA 4.0)
- CC Attribution-ShareAlike 4.0 International (CC BY-SA 4.0)
- Custom License**
*Note: the default template is normally CC0 Public Domain (CC0 1.0), but may differ based on the configuration settings of the institutional collection or research collection.
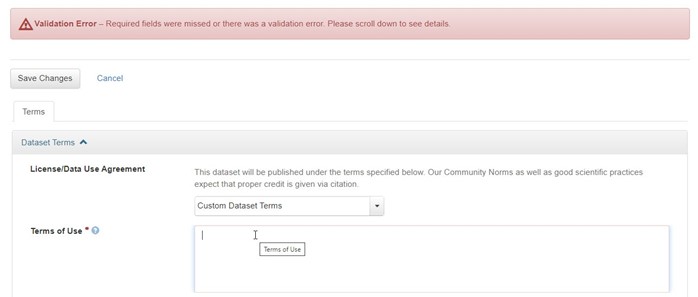
**If Custom License is selected, users will need to enter in the information in the Terms menu after the dataset is saved.
Collection administrators can also create a new dataset template with your own criteria. This is especially useful if you want all the datasets within your collection to have the same licensing, as creating a template eliminates the need to re-type this information for every dataset you add.
To better understand what each dataset template includes, click on the Eye button to view the details of that licence as they would appear in the Terms of Use.

Selecting a Default Template
To select a different default dataset template, administrators can click the Make Default button in the row of the preferred template.
Once selected, the Make Default button will be replaced with a Default button. Click the Default button to deselect the template as the default. If none of the options in the template table are selected as the default, the template with the CC0 Public Domain licence will remain as the default.
Note: Default template configurations are not inherited into sub-collections.
Adding a Template
The existing templates cannot be edited, they must be left as-is. However, they can be copied and used as the base for a new template. To create a new dataset template that uses an existing template as its base, click the Copy button for that template. A new screen will appear where you can enter the additional details you want for your new template.
If none of the listed templates are useful to you, you can click the Create Dataset Template button in the top right corner to create a new dataset template from scratch. A new screen will appear where you can enter all the details you want for your new template.
- Enter a name for your new dataset template in the Template Name field.

- Review the metadata fields that will be required (with a red asterisk) for all new datasets created in your collection.
- These required fields would have been selected when you created your collection.
- If you wish to change which fields are required for new datasets, you will need to edit the General Information for your collection. You cannot change required metadata fields while creating a new dataset template.
- Click the Save + Add Terms button to advance to the next screen.
- Under the Dataset Terms section, select one of the Creative Commons Licenses or Custom Dataset Terms.
- If you select Custom Dataset Terms, you must enter information into the “Terms of Use Field.”
- Enter any additional information under “Restricted Files + Terms of Access” section.
- Enter any additional licensing information, terms of use, terms of access, or restricted files information that apply.
- Click the Save Dataset Template button to save your new dataset template.
- The list of available dataset templates will appear on the screen, with your new template at the bottom.
- Click the Make Default button in the row for your new template to make it the default template for all new datasets added to your collection.
Guestbook Management
Guestbooks are created and managed at the collection level and are designed to capture information about the users of your dataset every time they preview or download one of your files. The guestbook requirements and fields will appear to the user as a pop-up when they click an Explore or Download button. Information you collect from users is stored as part of your collection, which you can view at any time.
Guestbooks might be useful if you’re trying to track the locations of users (e.g., country) or if you want to get a better idea what users are doing with your data (e.g., project name or description). Keep in mind that users will be required to complete this information every time they want to preview or download your data. One user may opt to download five separate files from your dataset and would be required to complete this information five times.
Please note that Guestbooks can be inherited from parent collections into sub-collections, so you can reuse Guestbooks in sub-collections. However, Guestbook responses can only be viewed from the direct parent collection.
Create a Guestbook
- Under the Edit > Dataset Guestbooks menu of your collection, you can review the list of available Guestbooks on this page and determine if one of them will meet your needs. If you deselect “Include Guestbooks from Borealis,” then the Guestbooks will not be inherited from parent collections.

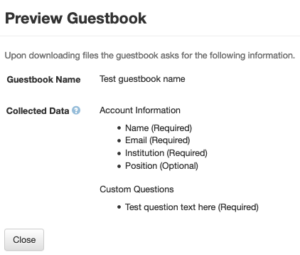
- Click on the Eye button to see a list of required information a user would need to input if this Guestbook was used.
- If you see an existing guestbook that meets some, but not all, of your needs, click the Copy button to create a new Guestbook using the existing one as a base.
- Alternative, if none of the existing guestbooks meet your needs, click the Create Dataset Guestbook button to create a new guestbook from scratch.

- Enter the name for your guestbook in the Guestbook Name field.
- Click the checkbox beside the name of any of the four fields—Name, Email, Institution, or Position—in the Data Collected section if you want to include the field in your guestbook.
- If one or more of these fields is selected, it will be considered a required field for the user. If they do not provide an answer, they will not be able to view or download your file(s).
- Use the Custom Questions section to create your own guestbook questions.
- Go to step 8 if you want to add custom questions.
- Go to step 13 if you don’t want to add custom questions.
- Select one of the two options available in the Question Type drop-down menu: Text or Multiple Choice.
- Type the question you want to ask in the Question Text field.
- For multiple choice questions, enter the first possible response in the Response Options field.
- Click the plus (+) button beside the response option you just entered if you want to provide another multiple choice option.
- Click the minus (-) button to delete a multiple choice answer you no longer want to use.
- Check the box beside the Required field if you want the custom question to be required from every user.
- If you leave this box unchecked, a user will not need to provide an answer to this question before they view or download files.
- Click the plus (+) button beside the Question Type and Question Text fields if you want to add more custom questions.
- Complete steps 8 through 11 for each custom question you want to include.
- Click the minus (-) button to delete a custom question you no longer want to include.
- Click the Create Dataset Guestbook button to save your changes and activate your new guestbook.
- You’ll be returned to the main guestbook page with your new guestbook listed last.
- Use the buttons on your newly created guestbook’s row to Preview, Copy, Edit, or Delete the guestbook.
- You can only Edit and Delete guestbooks you created.
- Click the Disable button if you no longer want that guestbook to be available to the datasets within this collection.
- Click the Enable button to allow the guestbook to be available to any dataset within this collection.
- To enable a Guestbook for a dataset, follow the steps in the Enabling Guestbooks section.
View Guestbook Responses
You can only view the responses at the direct parent collection level (i.e., not the parent of a parent). If you do not have permissions to view Guestbook responses in the parent collection, you will need to contact the administrator of the collection to access Guestbook responses. If more than one dataset within the collection used the same Guestbook, responses for all those datasets will be listed on the same page.
To view responses:
- Select Edit > Dataset Guestbooks in a collection.
- Click the View Responses button on the guestbook row to view the responses provided to datasets that have used that guestbook.
- Click the Download Responses button to download all responses as a CSV file.