There are two main ways to upload metadata into Archivematica:
- Uploading via the interface is for transfer metadata only and is limited to the use of the 15 basic terms of the Dublin Core standard with non-repeating fields.
- Uploading metadata files allows you to include transfer, folder/subfolder, and item level metadata using Dublin Core or custom metadata, and can also enable the repetition of terms, such as multiple subjects. Metadata can be formatted in CSV, XML, or JSON files.
It is best to use one or the other method of metadata ingest rather than both. Any transfer level metadata in metadata files will be overwritten by metadata that is added via the interface. However, both can be used in combination – adding transfer metadata via the interface and folder or item metadata via imported file/s.
XML import
If you choose to import your descriptive metadata via XML files, it is best to create the files before uploading and processing your transfer in Archivematica so that all your data files (digital items and metadata) can be packaged and transferred together. However, you are also able to upload these files at any time during processing in Archivematica before the “Approve Normalization” decision.
XML import can be used alongside CSV and JSON import with no issues. If transfer metadata is also entered in the interface, it will override any entered through import.
To import XML-formatted metadata files, you will need to create a source-metadata.csv file alongside your XML files.
Before you begin: Checking namespaces and root elements
In order to import metadata from XML files, Archivematica must first be configured with a list of all XML schema locations (as defined in the xsi:noNamespaceSchemaLocation or xsi:schemaLocation attributes), namespaces and root element included in the imported XML files.
If a schema, namespace, or root element that is declared in your XML metadata files is not included in this list, the metadata from that file will not be parsed into the METS file. If you are unsure if a schema, namespace, or root element that you are working with has been configured for your instance, please contact us.
Organizing the transfer
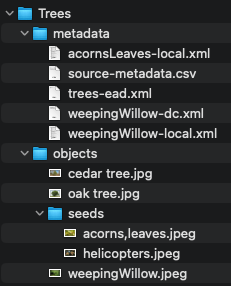
In a basic Archivematica transfer, original files submitted for preservation processing are stored in a folder called “objects”. A second folder called “metadata” is required at the same level as “objects” to contain the XML metadata files and source-metadata.csv file.
Below is an example of how a basic transfer is structured for XML metadata import. Note that the “objects” and “metadata” folders are at the same level and are contained in the “Trees” folder. The “objects” folder contains images for preservation processing, including images in a “seeds” subfolder. The “metadata” folder includes a source-metadata.csv file alongside several XML files. A transfer can include any number of XML files for import.
Preparing the source-metadata.csv
In addition to the XML metadata files, you must include in your transfer a source-metadata.csv file that maps each XML file to its corresponding path and provides a label to identify the type of metadata represented. This CSV file must be saved in the “metadata” folder with the name “source-metadata.csv” and with UTF-8 encoding.
Archivematica requires three columns labelled in the following order: filename, metadata, type.
The filename column
The first column in the CSV must be labelled “filename”. This field contains the full path to the folders or items in the transfer, and must start with “objects”. Archivematica uses this value to identify the file or folder that metadata is being assigned to. Metadata can be assigned at the transfer, folder/subfolder, and item level, and the three levels of metadata are formatted as follows for all transfer types:
| filename | Metadata level |
| objects | Transfer level metadata – applies to all files being preserved in the transfer |
| objects/folder | Folder level metadata – applies to all files within a particular folder in the transfer |
| objects/folder/document.pdf | Item level metadata – applies to a particular item in the transfer. This example item is contained in the above folder. |
| objects/picture.jpg | Item level metadata – applies to a particular item in the transfer. This example item is contained in the highest-level “objects” folder that is used to organize all items in the transfer. |
There are some technical requirements for entries in the filename column:
- Accents: Characters with accent marks (â, ã, ä, å, ǎ, ç, œ, ø, ß, etc.) in both file and folder paths must be replaced with their non-accented English equivalents in the CSV file. For instance, “ß” would be replaced by “ss” and “ø” with “o”. If these characters are not replaced, Archivematica will not be able to read the CSV file and processing will fail with a UTF-8 encoding error.
- Non-Latin characters: Characters outside of the Latin alphabet, such as Arabic and Chinese scripts, must be replaced with the transliterated version of the text in file and folder names in the CSV file. The transliteration must match the one generated by Archivematica during the “Change object and directory filenames” job in the “Change transfer filenames” microservice.
- Spaces and commas: Spaces and commas must be replaced with an underscore for folder and individual file names in the CSV file. This includes spaces and commas that appear in folder names embedded in an individual file name. If these characters are not replaced, Archivematica will not be able to match the filename in the CSV to the file in the transfer, and so will not assign the metadata.
- Symbols: Symbols (!, @, %, &, etc.) must be replaced with an underscore for folder and individual file names in the CSV file. If these characters are not replaced, Archivematica will not be able to match the filename in the CSV to the file in the transfer, and so will not assign the metadata.
- Cases: File and folder names and paths are case sensitive.
| Actual file path and name | Filename column formatting in source-metadata.csv |
| objects/folder, 1 | objects/folder__1 |
| objects/folder&2 | objects/folder_2 |
| objects/folder 3 | objects/folder_3 |
| objects/français | objects/francais |
| objects/beihai北海 | objects/beihaiBei_Hai_ |
| objects/helicopters.jpeg | objects/helicopters.jpeg |
| objects/folder, 1/oak tree.jpg | objects/folder__1/oak tree.jpg |
| objects/folder&2/weeping&willow.jpeg | objects/folder_2/weeping_willow.jpeg |
| objects/français/exemple de vidéo.wav | objects/francais/exemple_de_video.wav |
| objects/beihai北海/city,1994.tif | objects/beihaiBei_Hai_/city_1994.tif |
Archivematica does not require a specific order for entries in the CSV. In these examples, entries are ordered by level: transfer, folders, and items.
Filenames can be repeated if more than one XML metadata file needs to be assigned to a single folder or file.
The metadata column
The second column in the CSV should be called “metadata”. Values in this column indicate the relative path to the XML file in the “metadata” directory that should be assigned to the corresponding filename in column A. Typically, this is the full name of the XML file, including its extension.
There are some technical requirements for file names in the “metadata” directory as well as the metadata column:
-
- Accents: Characters with accent marks (â, ã, ä, å, ǎ, ç, œ, ø, ß, etc.) can be included in file names. As with the filename column above, these characters must be replaced with their non-accented English equivalents. If these characters are not replaced, Archivematica will not be able to read the XML file and processing will fail.
- Non-Latin characters: File names for XML metadata can include characters outside of the Latin alphabet, such as Arabic and Chinese scripts. As with the filename column, these must be replaced with the transliterated version of the text in the CSV file and the transliteration must match the one generated by Archivematica.
- Spaces and commas: Spaces and commas cannot be included in file names. If spaces or commas are present, processing in Archivematica will fail. We recommend using hyphens or underscores instead.
- Symbols: Symbols (!, @, %, &, etc.) likewise cannot be included in file names and will cause processing to fail entirely.
- Cases: File names are case sensitive.
A single XML file can be assigned to multiple folders or items as needed. Note that Archivematica assumes that metadata assigned at a higher level applies to all folders/subfolders and items within it. If metadata is the same for all files within a folder for instance, the XML file can simply be mapped at the folder level.
The type column
The third and final column in source-metadata.csv is labelled “type”. The “type” refers to a unique identifier that you assign to the metadata in the XML file. In the METS file, this value is assigned to the “OTHERMDTYPE” attribute in the corresponding dmdSec (descriptive metadata section) for the imported XML metadata. Archivematica also relies on this identifier for metadata updates made using the re-ingest workflow.
Values in the “type” column have the following technical requirements:
-
- Accents: Certain characters with accent marks (â, ã, ä, å, ǎ, ç, œ, ø, ß, etc.) will cause processing to fail and cannot be used. We recommend avoiding accent marks where possible.
- Non-Latin characters: Non-Latin characters should not be used as they will be replaced by other characters, such as underscores and question marks.
- Spaces and commas: Spaces and commas can be included.
- Symbols: Symbols (!, @, %, &, etc.) can also be used.
- Cases: Values can be upper or lower case.
Each type should be unique to avoid potential collisions or errors if you use re-ingest workflows in future. As well, if both the filename and type are the same for multiple entries, metadata from only one of the corresponding XML files will be imported into the METS file.
Example: all transfer types
Below is an example source-metadata.csv mapping XML metadata files to a collection of tree photos. The “type” values are used to identify the standard applied in each XML file.
| filename | metadata | type |
| objects | trees-ead.xml | ead-xml |
| objects/weepingWillow.jpeg | weepingWillow-dc.xml | dc-xml |
| objects/weepingWillow.jpeg | weepingWillow-local.xml | local-xml-1 |
| objects/seeds/acorns_leaves.jpeg | acornsLeaves-local.xml | local-xml-2 |
Once you are done entering metadata, save the file as “source-metadata.csv” and ensure it is formatted using UTF-8 encoding as detailed above.
Updating metadata during re-ingest
If you have fully processed a transfer, you can use the “metadata re-ingest” workflow to add new XML-formatted metadata as well as modify or remove metadata that had been added using the XML import workflow. Metadata added via CSV import or the interface cannot be updated with this workflow.
This re-ingest workflow can be run multiple times.
- Create and save your XML metadata file/s in a new directory.
- Create and format a new source-metadata.csv.
- To add new metadata, format the entry as above.
- To update existing metadata, replicate your initial entry and replace the old path in the “metadata” column with the path to the updated XML file.
- To delete metadata that was previously added to the METS file, replicate your initial entry and remove the path from the “metadata” column to indicate that the metadata block should be deleted.
filename metadata type action objects rights-premis.xml premis-xml Add new metadata objects/weepingWillow.jpeg weepingWillow-dc-v2.xml dc-xml Update existing metadata objects/weepingWillow.jpeg local-xml-1 Delete existing metadata
- Save your CSV file with the name “source-metadata.csv” and UTF-8 encoding in the same directory as your XML file/s.
- Upload the directory to your Globus transfer source location.
- Open the transfer to be re-ingested in the “Archival Storage” tab.
- Click the “Re-Ingest” tab at the bottom of the page.
- Select “Metadata Re-Ingest” as the re-ingest type then click the blue “Re-Ingest” button.

- Note that this process can also be used with partial and full re-ingest types if you also wish to re-create a DIP or re-normalize the AIPs contents, for example. The “Metadata re-ingest” option process is specifically for updating metadata in the METS file, and other functions like normalization will not run even though the option may be presented as part of the processing workflow.
- The AIP will then move from the storage to the Ingest tab. It may take a while, so watch for the red “1” to appear on the Ingest tab.
- In the Ingest tab, approve the re-ingest.
- Before the “Approve Normalization” step of your transfer, browse to the metadata options page by clicking the small report icon on the right side of the transfer:

- Under the “Metadata” heading, click “Add metadata files.”
- Select Globus as a transfer source location from the dropdown menu and click “Browse.”
- Under “Select a directory” expand the file browser to find the directory with your new CSV and XML files. Either click the blue “Add” link next to each file name or the blue “Add” link next to the name of the directory.
- The file path/s will appear under the “Browse” button.
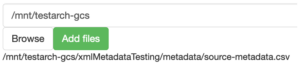
- Click the green “Add files” button and wait for the paths to disappear. This means the files have been loaded.
- Return to the main Ingest pane and continue processing your transfer as usual. Do not choose to normalize files in this instance as these functions will not actually be run; running a partial or full reingest will perform file normalization.