- CSV Import
- Before you begin: Determine transfer type
- Un-bagged transfers
- Bagged transfers
- Uncompressed vs. zipped
- Bagged vs. not bagged
- Organizing the transfer
- The filename column in metadata.csv
- UTF-8 encoding
- Formatting descriptive metadata
- Example: standard or zipped transfers
- Example: bagged transfers (zipped or unzipped)
- Adding a CSV during processing
- Adding a CSV during re-ingest
- Other methods
There are two main ways to upload metadata into Archivematica:
- Uploading via the interface is for transfer metadata only and is limited to the use of the 15 basic terms of the Dublin Core standard with non-repeating fields.
- Uploading metadata files allows you to include transfer, folder/subfolder, and item level metadata using Dublin Core or custom metadata, and can also enable the repetition of terms, such as multiple subjects. Metadata can be formatted in CSV, XML, or JSON files.
It is best to use one or the other method of metadata ingest rather than both. Any transfer level metadata in metadata files will be overwritten by metadata that is added via the interface. However, both can be used in combination—adding transfer metadata via the interface and folder or item metadata via imported file/s.
CSV Import
If you choose to import your descriptive metadata in CSV files, it is best to create the files before uploading and processing your transfer in Archivematica so that all your data files (digital items and metadata) can be packaged and transferred together. However, you are able to upload these files at any time during processing in Archivematica before the “Approve Normalization” decision.
Before you begin: Determine transfer type
Choosing a transfer type in Archivematica will impact how your descriptive metadata is imported when using the CSV method.
Archivematica has four key transfer types:
Un-bagged transfers
- Standard transfer: A folder with the objects and metadata folders at the top level
- Zipped directory: The same as the above, but as a .zip or .tar.gz package
Bagged transfers
- Unzipped bag: A folder of files in BagIt format. The top-level directory will contain checksum manifests and a folder called data that itself contains the objects and metadata folders
- Zipped bag: The same as above, but as a .zip or .tar.gz package
There are two key differences here: whether your transfer is zipped, and whether it is bagged.
Uncompressed vs. zipped
- Standard (uncompressed) transfers are easy to create—it’s a folder with files inside—and don’t require any additional steps or software
- Zipped transfers make it easy to package and upload files all together. Zip files of both types also have the advantage of acting as a primary integrity check. If zip extraction fails in Archivematica, then you know the zip was either corrupted or not fully uploaded to the transfer source point, and should be re-created on your local system or re-uploaded. Note that Zipped transfers must be in .zip or .tar.gz format. Other kinds of packages in .7z, .rar, etc. will not function as transfer types.
Bagged vs. not bagged
- Bagged transfers are created using a tool that implements the BagIt specification. Tools that create bags place your preservation and metadata files in a folder called data that is accompanied by a manifest of files with their checksums that enables the files to be validated after transfer, including when Archivematica ingests the package as part of this workflow. This adds a higher-level assurance that files have retained their fixity during movement from your local system to Archivematica.
- Unbagged transfers mean that you can reduce the number of steps and time spent during a processing workflow. Bagging transfers can be very slow for large packages or for files being accessed over network connections such as a shared drive folder. Tools to create bags also require separate installation and upgrades. Using the zipped directory transfer format instead of bags is a good alternative if you would like to ensure a basic level of integrity during transfer.
Uploading metadata using a CSV file means creating that file in a text editor or spreadsheet program. The file must be named ‘metadata’ and be saved in CSV text format with UTF-8 encoding.
Organizing the transfer
Normally, all original files destined for preservation processing in a transfer are contained in a folder called ‘objects’. A second folder called ‘metadata’ must be created at the same level as ‘objects’. The ‘metadata’ folder should contain the metadata.csv file. Here is an example of how the basic file structure appears in a file browser:

Note that the ‘objects’ and ‘metadata’ folders are both at the same level and contained within a folder called ‘Trees’. ‘Trees’ is the name of the transfer. It contains an ‘objects’ folder with images for preservation processing, and includes a subfolder, as well as a ‘metadata’ folder with the CSV file.
Tips:
- When zipping or bagging a transfer, select both the ‘metadata’ and ‘objects’ folders at the same time and bag and/or zip them together so that these folders continue to be at the top level within their enclosing directory.
- When uploading an unzipped standard transfer, the entire ‘Trees’ folder should be uploaded.
- If there are additional folders between the top level and the ‘objects’ and ‘metadata’ folders, the metadata will not be parsed correctly. This is a common issue, as many software programs for creating zips will add an additional level within the folder hierarchy.
The filename column in metadata.csv
The first column in the CSV must be labelled ‘filename’. This field contains the path to the folders or items in the transfer, and Archivematica uses it to match the file with the appropriate level of metadata—transfer, folder/subfolder or item.
The three levels of metadata are formatted as follows in the filename column for a standard or zipped directory transfer type:
| filename | Metadata level |
| objects | Transfer level metadata – applies to all original files in the transfer |
| objects/folder | Folder level metadata – applies to a particular folder in the transfer |
| objects/folder/document.pdf | Item level metadata – applies to a particular item in the transfer. This item is contained within the folder above. |
| objects/picture.jpg | Item level metadata – applies to a particular item in the transfer. This item is contained within the highest-level objects folder used to organize all items in the transfer. |
The three levels of metadata are formatted as follows in the filename column for a bagged transfer type:
| filename | Metadata level |
| objects | Transfer level metadata – applies to all original files in the transfer |
| objects/folder | Folder level metadata – applies to a particular folder in the transfer |
| data/objects/folder/document.pdf | Item level metadata – applies to a particular item in the transfer. This item is contained within the folder above. |
| data/objects/picture.jpg | Item level metadata – applies to a particular item in the transfer. This item is contained within the highest-level objects folder used to organize all items in the transfer. |
Note that ‘data/’ must precede the path for items in a bagged transfer with descriptive metadata, but not for folders or the top objects level.
There are some technical requirements for entries in the filename column that apply to all metadata.csv files created for ingest, regardless of the transfer type:
- Accents: No files or folders in the transfer can have accents in their paths: Archivematica is not able to match metadata to paths with accents in the transfer. While you can process files and folders with accents in their names, you cannot assign descriptive metadata to them. Accents can be included in metadata values.
- Spaces and commas: For folder level metadata, any spaces or commas in folder names need to be replaced with an underscore in the CSV. For file level metadata, folder names do not need to be edited, and spaces and commas in file names can also remain.
- Symbols: Symbols (!, @, %, &, etc.) must be replaced with an underscore in the folder name. They can remain intact for individual files.
| Actual file path and name (standard transfer) | Filename column formatting in metadata.csv |
| objects/folder, 1 | objects/folder__1 |
| objects/folder&2 | objects/folder_2 |
| objects/folder 3 | objects/folder_3 |
| objects/folder4 | objects/folder4 |
| objects/helicopters.jpeg | objects/helicopters.jpeg |
| objects/folder, 1/oak tree.jpg | objects/folder, 1/oak tree.jpg |
| objects/folder&2/weeping&willow.jpeg | objects/folder&2/weeping&willow.jpeg |
| objects/folder 3/cedar!tree.jpg | objects/folder 3/cedar!tree.jpg |
| objects/folder4/aco,rns.jpeg | objects/folder4/aco,rns.jpeg |
- The order of entries in the filename column does not matter, though the examples in this document favour ordering by level: transfer, folders (if applicable), and items.
- File names and paths are case sensitive.
UTF-8 encoding
All CSVs must be formatted with UTF-8 encoding. This is especially important when copying and pasting metadata into the spreadsheet from other sources, as non-UTF-8 characters can cause transfers to fail in Archivematica.
There are several methods to do this:
- Google Sheets and LibreOffice both use UTF-8 as the default encoding method
- In certain versions of Excel (only when installed via Office 365 packages as opposed to the standalone version), there is the option to save a spreadsheet as a CSV UTF-8 format file. When going to Save As, select “CSV UTF-8” under the “Save as type” or “File format” menu option.

- Notepad (or other text editors): After creating your metadata.csv file in Excel, open the file in Notepad.
Click File > Save As and make sure that the encoding selected is UTF-8.

In all cases, the file must be named ‘metadata.csv’
Formatting descriptive metadata
- Any Dublin Core elements should be preceded by ‘dc.’ such as ‘dc.title’ or ‘dc.subject’.
- Extended Dublin Core terms may be used with the same formatting as simple Dublin Core elements. Note that packages with extended Dublin Core cannot be re-processed using a metadata or partial re-ingest.
- Fields may be repeated by adding an additional column with the same name.
- Custom metadata fields should not have spaces in their names. Use dashes or underscores as shown below.
- Do not include any empty columns in the middle of your CSV file.
- Remove any leading and trailing spaces in field names and cell entries.
Example: standard or zipped transfers
This example metadata.csv is for a collection of tree photos with a few simple Dublin Core fields applied (and a repeating subject field) plus an additional custom field.
| filename | dc.title | dc.date | dc.subject | dc.subject | tree-type |
| objects | Photo collection of trees | 2020 | |||
| objects/cedar-tree.jpg | Cedar tree | 2020-09-18 | coniferous | Ontario | cedar |
| objects/oak-tree.jpg | Oak tree | 2020-05-13 | deciduous | California | oak |
| objects/weeping-willow.jpg | Weeping Willow | 2020-07-05 | deciduous | New York | willow |
| objects/seeds | Seeds | ||||
| objects/seeds/acorns.jpg | Oak seeds | 2020-08-01 | deciduous | Ontario | oak |
| objects/seeds/helicopters.jpg | Maple seeds | 2020-08-21 | deciduous | Nova Scotia | maple |
This table shows the different levels of metadata in use in the above example:
| Level | filename |
| transfer | objects |
| item | objects/cedar-tree.jpg |
| item | objects/oak-tree.jpg |
| item | objects/weeping-willow.jpg |
| folder | objects/seeds |
| item | objects/seeds/acorns.jpg |
| item | objects/seeds/helicopters.jpg |
Once you are done entering metadata, save the file as ‘metadata.csv’ and ensure it is formatted using UTF-8 encoding as detailed above.
Example: bagged transfers (zipped or unzipped)
Using Bags in combination with metadata means a slight change to the filename column to reflect the new path in the Bag. The folder “data/” gets appended to the beginning of any items in the transfer, but not folders or the transfer-level metadata.
| filename | dc.title | dc.date | dc.subject | dc.subject | tree-type |
| objects | Photo collection of trees | 2020 | |||
| data/objects/cedar-tree.jpg | Cedar tree | 2020-09-18 | coniferous | Ontario | cedar |
| data/objects/oak-tree.jpg | Oak tree | 2020-05-13 | deciduous | California | oak |
| data/objects/weeping-willow.jpg | Weeping Willow | 2020-07-05 | deciduous | New York | willow |
| objects/seeds | Seeds | ||||
| data/objects/seeds/acorns.jpg | Oak seeds | 2020-08-01 | deciduous | Ontario | oak |
| data/objects/seeds/helicopters.jpg | Maple seeds | 2020-08-21 | deciduous | Nova Scotia | maple |
This table shows the different levels of metadata in use in the above example:
| Level | filename |
| transfer | objects |
| item | data/objects/cedar-tree.jpg |
| item | data/objects/oak-tree.jpg |
| item | data/objects/weeping-willow.jpg |
| folder | objects/seeds |
| item | data/objects/seeds/acorns.jpg |
| item | data/objects/seeds/helicopters.jpg |
Adding a CSV during processing
Users can take advantage of a workflow option that allows them to import a metadata.csv file after initiating a transfer either without metadata or with metadata you want to change. Any time before the “Approve Normalization” step of that transfer:
- Create and format a CSV file as above for a standard transfer with descriptive metadata for the relevant objects in the transfer. This applies even if the originating transfer was bagged.
- Upload the CSV file to your transfer source location.
- Before the “Approve Normalization” step of your transfer, browse to the metadata options page by clicking the small report icon on the right side of the transfer:

- Under the “Metadata” heading, click “Add metadata files.”
- Click “Browse.”
- Under “Select a directory” expand the file browser to find the metadata.csv file. Click the blue “Add” link next to the file’s name.
- The file path will appear under the “Browse” button.
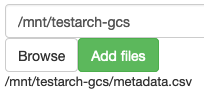
- Click the green “Add files” button and wait a moment for the path to disappear, which means the file has been loaded.
- Return to the main Ingest pane and continue processing your transfer as usual.
*Note that this process will not work if there is an issue with a field name in the original metadata.csv file—such as if a field name is misspelled or formatted incorrectly, or if there is a fully blank column with no field name or metadata. This process is also currently not functional when both an S3-based and Dataverse transfer source locations are enabled. This issue has been filed.
Adding a CSV during re-ingest
If you have fully processed a transfer without metadata, or you want to change the metadata after the transfer is completed, you can use the “metadata re-ingest” workflow.
Important notes:
- Updates to metadata via re-ingest can only be completed for a package with metadata written to the METS file once. Subsequent updates would require you to download the AIP and reprocess it from scratch.
- Metadata re-ingest will fail for packages that use extended Dublin Core terms.
To use the metadata re-ingest workflow:
- Create and format a CSV file as above for a standard transfer with descriptive metadata for the relevant objects in the transfer.
- This is the case even if the AIP was initially created from a bagged type transfer.
- The format is the same as for other CSV ingests and should reflect the structure and filenames of the AIP, including any changes to file names that may have been performed by Archivematica (such as replacing spaces or other characters in filenames with underscores).
- Upload this file to your transfer source location.
- Open the transfer to be re-ingested in the “Archival Storage” tab.
- Click the “Re-Ingest” tab at the bottom of the page.

- Select “Metadata Re-Ingest” as the re-ingest type then click the blue “Re-Ingest” button.
- Note that this process can also be used with partial and full re-ingest types if you also wish to re-normalize the AIPs contents or re-create a DIP, for example. The “Metadata re-ingest” option is specifically for updating metadata in the METS file, and other functions like normalization will not run even though the option may be presented as part of the processing workflow.
- The AIP will then move from the storage to the Ingest tab. It may take a while, so watch for the red “1” to appear on the Ingest tab.
- In the Ingest tab, approve the re-ingest.
- Before the “Approve Normalization” step of your transfer, browse to the metadata options page by clicking the small report icon on the right side of the transfer:
- Under the “Metadata” heading, click “Add metadata files.”
- Click “Browse.”
- Under “Select a directory” expand the file browser to find the metadata.csv file. Click the blue “Add” link next to the file’s name.
- The file path will appear under the “Browse” button.
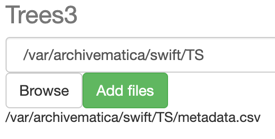
- Click the green “Add files” button and wait a moment for the path to disappear, which means the file has been loaded.
- Return to the main Ingest pane and continue processing your transfer as usual. Do not choose to normalize files in this instance as these functions will not actually run; running a partial or full reingest will perform file normalization.
Other methods
Dublin Core metadata may be uploaded in JSON format as well. See the Archivematica documentation for further instructions.