- Logging In
- Managing Your Account
- Settings
- Moving Between Projects
- Containers
- Adding Containers
- Setting a Container as Public Access
- Protected Data
- Viewing and Updating Container Information
- Segments Containers
- Deleting Containers
- Objects
- Uploading Objects
- Uploading Large Objects
- Creating Pseudo Folders
- Locating Objects
- Downloading Data
- Managing Objects
- Versioning
- Copying
- Deleting Data
- Public Access
- Using the Public Project
- Generating Static Links
- Containers With Over 10,000 Items
- Hosting Static Sites
- Monitoring Storage Use
Horizon is Openstack’s default dashboard where you can manage users and projects, and browse, upload, and download files. It is intended as an easy-to-use graphical interface for viewing and accessing the data you have stored in the OLRC.
Due to the limitations of web browser-based applications, please note that Horizon is not suitable for uploading, downloading, or managing large volumes or quantities of data. You will experience significantly higher performance and reliability using the Swift CLI, S3 API, or one of our other recommended tools.
Logging In
A user account is required to use Horizon. To log in, enter your username, password, and domain and click “Sign In.”
If a new account is required or you need assistance with your username, password, or domain, please contact your domain administrator for support. If you are unsure who your domain administrator is, please contact us.

Managing Your Account
When you are logged into Horizon, your username will appear in the top right corner of the dashboard. Select your username to open a drop-down menu with five options:
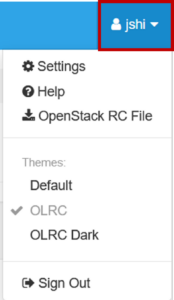
- Settings: adjust dashboard settings and change your password
- Help: access this Scholars Portal guide to the OLRC
- OpenStack RC File: download an OpenRC file for use with the Swift command line and other tools
- Themes: customize your dashboard with the “OLRC” or “OLRC Dark” themes, or select “Default” to revert to the base OpenStack theme
- Sign Out: log out of your OLRC account
Settings
The “Settings” option will bring you to the User Settings page, where you can change your dashboard settings and password.
You have the option to modify four dashboard settings:
- Language: the display language in the Horizon interface
- Timezone: the timezone used for container creation dates and object upload and modification timestamps
- Items Per Page: define how many objects and pseudo folders are displayed per page. The default is 20, but it can range from 1 to 1,000
- Log Lines Per Instance: this setting is associated with a separate OpenStack service that is not provided through the OLRC
To change your password, select the “Change Password” tab in the left sidebar. On the Change Password page, enter your current password and new password twice for confirmation. After you select “Change” to update your password, you will be automatically logged out of Horizon. Log in again with your new password to continue.
Moving Between Projects
Once you are signed in, you will see the Containers page for your primary project. There are two options to view the projects that you have access to.
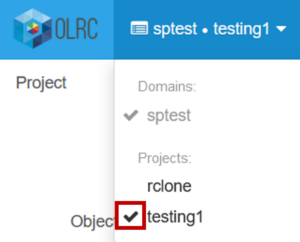
To view and switch between projects, expand the drop-down menu in the top left corner. A check mark appears next to the project that you are currently in. Select the name of another project to move between projects.
For more information about these projects, expand the “Identity” tab in the left sidebar and select “Projects.” This will display a table with the Name, Description, Project ID, Domain Name, and status of each project that you have permissions to view.

You may also move between projects here by selecting the “Set as Active Project” button to the right of the project that you would like to work on.
If you would like to share data with the general public, please use the “public” project.
Containers
Adding Containers
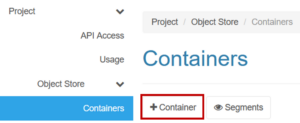
To create a new container, click the “+ Container” button.
In the “Create Container” dialog box, enter a name for the container. Container names must be unique to the project, may not contain forward slashes (“/”), and must follow the Amazon S3 naming rules. An error message will appear in the dialog box if the container name does not match the S3 naming rules. Once created, containers cannot be renamed.
You can also decide if you would like data in the container to be public or protected here. These settings can also be changed after a container is created. When the form is complete, click “Submit” to create the container.
Setting a Container as Public Access
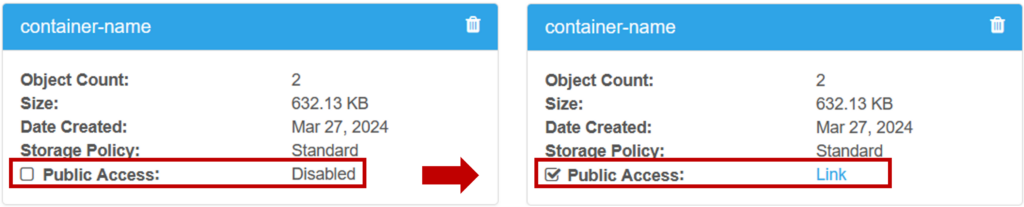
Individual containers can be set to “public” to provide end-users within your organizational IP range with access to data in that container.
The “public” setting can be toggled when a container is created or by selecting the “Public Access” checkbox at a later time. Once the public access setting is enabled, static links for individual objects can be generated and shared.

If you would like to provide the general public with access to data without IP restrictions, please use the “public” project.
If you would like finer control over IP restrictions, an experimental feature is also available to limit access to public containers by IP range.
Protected Data
By default, any user assigned a member or administrator role can upload, modify, download, and delete data from a container. To prevent data from being accidentally deleted or overwritten, the “Protected” setting can be enabled when a container is created or via the “Update Container” window at a later time.
If a user attempts to delete or modify an item while this setting is turned on, they will receive an error message and the action will not be completed. This setting must be disabled before objects can be deleted or modified.
If you use the OLRC as the storage solution for another system, make sure the “Protected” setting is set correctly before making changes to stored data. If the container is set to protected, you may receive error messages from the connected application.
Viewing and Updating Container Information
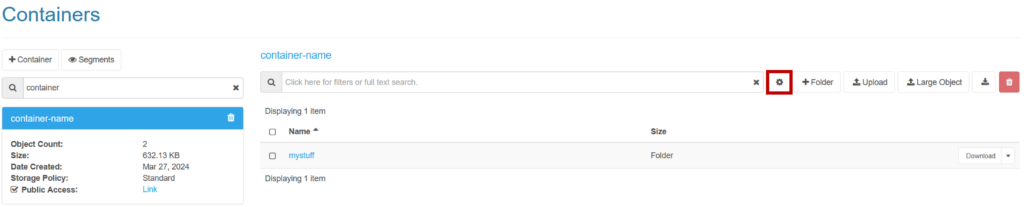
A list of all the containers in a project that you have access to will appear on the left of the dashboard. Containers are listed in numerical order, if container names begin with a number, and then alphabetical order. If your project has many containers, you can use the search bar above the container listing to search for the relevant container by name.

You can view information about a container by selecting the name of the container in the listing. This will present you with an information panel in the listing and the contents of the container to the right.
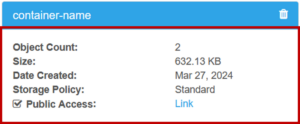
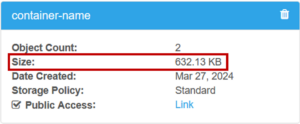
The information panel includes an object count, the total volume of data, the creation date, storage policy, and public access status for the container. You may also enable or disable the “Public Access” setting from this panel. A notification will appear in the top right of your screen if the setting is changed.
Container information and settings can also be accessed by selecting the gear icon next to the search bar above the object listing.
This will display an “Update Container” window. In addition to the information provided in the panel, this window also includes a checkbox to enable and disable the “Protected” and “Public Access” options.
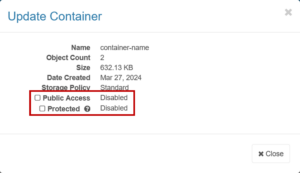
When the “Public Access” and “Protected” settings are changed, the status will be updated in the interface and a green “Success” notification will appear in the top right of the screen confirming the change.
Segments Containers
When a large object is uploaded to a parent container using the “Large Object” function, the object is stored in segments of up to 100MB for efficiency. By default, these segments are stored in a separate container to prevent clutter in the parent container. If a large object has never been uploaded to a container, the container will not have a corresponding segments container.
Segments containers have the same name as their parent containers with “+segments” or “_segments” appended to the end. Segments containers are hidden by default but can be viewed by selecting the “Segments” button above the container listing.

Deleting Containers
If you would like to delete a container, you must first remove all data from the container. If you attempt to delete a container that contains data, you will receive an error message and the action will not be completed.
Once the container is empty:
- Select the “Delete Container” button to the right of the container name in the container listing.
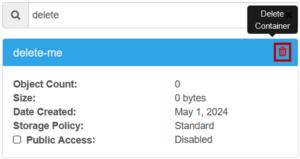
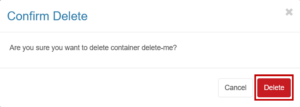
- In the following “Confirm Delete” window, select “Delete” to confirm your decision.
- When the deletion is complete, the container will be removed from the listing and a green notification will display in the top right corner.
If a segments container is associated with a container that you would like to delete, the segments container will not be automatically deleted when the parent container is deleted. This is because the CLI can be used to override the default behavior and specify which container segments are uploaded to. As such, a single container could be designated as the segments container for multiple parent containers. In this scenario, automatic deletion could cause unintended data loss.
To delete a segments container, select the “Segments” button to view the segments containers, then follow the above steps for deleting containers.
Objects
Uploading Objects
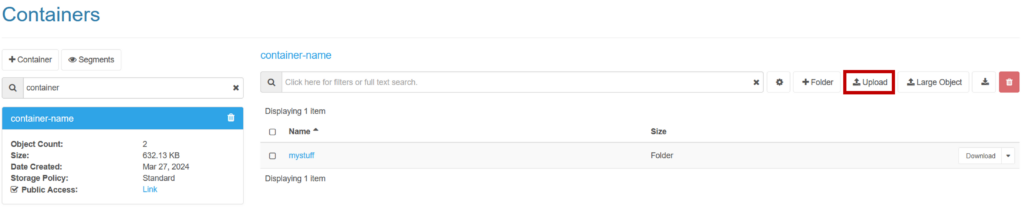
Navigate to the container that you would like to upload objects to and click “Upload” to upload files or directories. We recommend using this “Upload” option for files of up to 100MB in size.
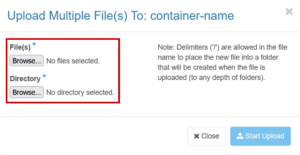
From the “Upload Multiple File(s)” window, you will have the option to browse for “File(s)” or a “Directory.” One or more files and directories can be uploaded at a time by either selecting multiple files in the directory explorer or selecting “Browse…” to return to the directory explorer and add more files or directories. Your browser may present you with a confirmation pop-up when uploading directories. Select “Upload” to proceed.
You will see a list with the name and size of each item selected for upload in the window. For directory uploads, a separate entry for each object in the directory will be listed with the full path to the file retained in the object name. The original directory structure will be replicated in the interface once uploaded for ease of use.
You may rename listed objects in the leftmost field or remove items from the selection by clicking the “Remove” button to the right. If you would like to place an object in a pseudo folder or modify an existing folder structure, use forward slash (“/”) delimiters in the object name to indicate the desired path.

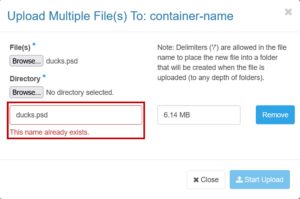
Objects must have unique names. You will see a “This name already exists” error message if an object with the same name is already stored in the container.
Note that if two or more objects with the same name are being uploaded and the name is not taken by an uploaded object, no error will appear but only one of the objects will be uploaded. Objects also cannot be renamed after they are uploaded.
When you are satisfied with your selection, click “Start Upload.” Progress bars will track the status of the upload for individual files and your overall selection. Items will disappear from the list as they are successfully uploaded.
Please note that network interruption or session expiry can result in incomplete uploads for directories or no upload for individual objects for both regular and large object uploads.
Uploading Large Objects
We recommend using the “Large Object” button to store files that are between 100MB and 5GB in size. When a large object is uploaded to the OLRC using this option, it is transferred in smaller pieces, called “segments” for efficiency. A manifest listing the segments associated with the uploaded object will be stored in the parent container of your choosing, with the segments stored in a corresponding segments container.
As with the regular “Upload” function, locate the file you would like to upload using the file browser and rename as needed before selecting “Start Upload.” Only one object can be uploaded at a time.
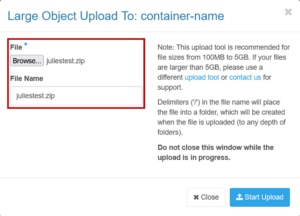
Please note that objects uploaded in this manner cannot be displayed or streamed in the browser due to segmentation.
If your files are larger than 5GB, please use a different tool or contact us for support.
Creating Pseudo Folders
Pseudo folders can be created in Horizon to replicate the more common hierarchical file system for organization and navigation. Two methods are available for creating pseudo folders.
To create folders before you upload data, select the “Folder” button in the relevant container and give your folder a unique name in the “Folder Name” field in the “Create Folder” window. Once your folder is named, select “Create Folder.”

To create nested structures with this method, you can either:
- Select the “Folder” button and in the “Folder Name” field of the “Create Folder” window, enter the names for each folder level one after the other, separating each level with a forward slash (“/”) delimiter
- Click through your existing folders and select the “Folder” button once you reach the desired depth
Folders can also be created during upload. If you choose to upload a directory, the structure of that directory will be replicated in Horizon. Individual objects can be placed in folders by adding a folder structure to the beginning of the object name. Names can point to existing folders or can define new folders to be created. Folder structures should be delimited by a forward slash (“/”).
Once created, pseudo folders cannot be renamed or moved.
Locating Objects
The contents of a container can be located by browsing the object listing. By default, 20 objects and folders are displayed per page.
The search bar above the object listing can also be used to search for specific folders or objects by name. This search will not look recursively into folders. To search within a folder, you will need to click into the relevant folder before conducting your search.
Downloading Data
Individual files can be downloaded by navigating to the file and selecting the “Download” button to the right of its name and size.
When a large object is downloaded, the segments are compiled and checked against a manifest before the object is served. Due to segmentation, objects uploaded using this method will only be downloaded when shared using public access URLs. These objects will not be streamed or displayed in the browser.
A pseudo folder, including all the objects and nested folders within it, can also be downloaded as a compressed tar package by locating the folder and selecting “Download.”

To download the entire contents of a container, select the download icon to the right of the search bar. The contents of the container will be downloaded in a single compressed tar.gz package named after the container.

Managing Objects
Once an object is uploaded, you are able to view basic information about it, edit the file to upload a new version, and create copies in other containers and folders. You can find these options by expanding the drop down menu next to the “Download” button for a given object.

Selecting “View Details” will open the “Object Details” window, which includes:
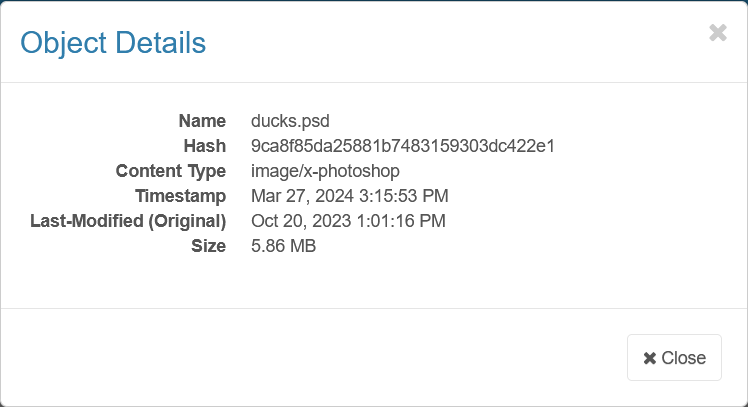
- Name: name of the object
- Hash: MD5 checksum of the object, calculated by OpenStack Swift
- Content Type: MIME type of the object
- Timestamp: the date and time when the object was uploaded
- Last-Modified (Original): the date and time when the original object was last modified
- Size: size of the object
Versioning
You can version an object by selecting the “Edit” option in the drop down menu. Selecting “Edit” will open the “Edit File” window, where you can select a file to replace the existing object in storage.
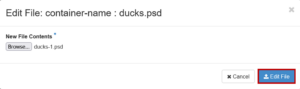
Please use this feature with caution: once you select the “Edit File” button in the “Edit File” window to confirm the change, the action cannot be undone.
You may wish to enable the “Protected” setting for a container to protect against accidental overwriting of files with this feature. The setting would need to be manually disabled each time you would like to version a file.
Copying
The “Copy” feature allows you to duplicate a stored object in another folder or container within the same project. This function will not remove the object from its original location.

In the “Copy Objects” window, identify the “Destination Container” where you would like to store the copy. The destination and origin containers can be the same. If you would like to copy the object to another container, you must create that container before the copy can be made.
You will also need to specify the name of your “Destination Object,” which refers to the copy. The name of the destination object does not have to be the same as the name of the origin object and can include a folder structure using the forward slash (“/”) delimiter. The new object cannot have the same name as existing objects within the destination container.
Once your “Destination Container” and “Destination Object” are set, select “Copy Object.” When the action is complete, you will be redirected to the location of the copy.
Deleting Data
Objects and folders can be deleted one at a time or in batch. If a container is set to protected, you will first need to disable this setting.
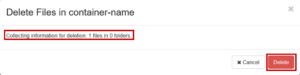
To delete a single object or folder, expand the drop-down menu next to the “Download” button and select “Delete.” A “Delete Files” window will appear to indicate the number of files and folders to be deleted. To confirm your decision, select “Delete” and a status bar will inform you when deletions are completed.
You can make a batch deletion by selecting the checkboxes to the left of the objects and folders that you would like to delete. Click the red trash can icon to the right of the search bar and confirm your deletion in the “Delete Files” window.
No additional steps are required to delete large objects. When a large object is selected for deletion, the associated segments are automatically removed from storage alongside the manifest that was stored in the parent container.
When the last object in a folder or nested folder structure is deleted, that folder or folder structure will be automatically removed from the interface as pseudo folders do not exist as independent objects in storage. A container will not be automatically deleted when all data in it is removed.
Public Access
Using the Public Project
By default, access to the OLRC is IP restricted and access to data is available only to users with accounts and appropriate permissions. To facilitate data sharing and access with members of your organization and the general public, each OLRC domain is configured with a “public” project that has no IP restrictions.
If you set a container in this project as “public”, you can generate links to individual objects using a predefined URL for sharing and use in other applications. For instance, a streaming link for a video hosted in the OLRC can be generated by appending the name of the object to the end of the predefined URL. This link can then be embedded in an online exhibit or discovery platform.
Generating Static Links
Enabling public access will provide you with a link in the “Link” text next to the setting. This URL points to an XML listing of all objects in the container. This listing can be shared with users, or links to individual objects can be created and shared by appending the object name to the end of your static URL.
Static URLs for secure, public sharing are structured as:
https://static.scholarsportal.info/domain/container/object
For example, the URL for a domain called “scholarsportal,” a container called “images,” and a file called “test.png” would be:
https://static.scholarsportal.info/scholarsportal/images/test.png
Objects accessed through public URLs may be viewed in-browser if the format is supported. For non-supported formats, files will be downloaded.
Containers With Over 10,000 Items
The XML object listing at the public access link is generated via an API call. To avoid overloading the API, this listing will only include the first 10,000 objects in a container.
If your container has over 10,000 items, you have two options for retrieving the full listing of objects.
Using Horizon’s pagination feature:
- Select the public access “link” button and download the initial XML list of 10,000 objects that is returned in the browser. The URL for this page takes the following structure:
https://olrc2.scholarsportal.info/v1/[project-identifier]/[container-name] - For each successive batch of 10,000 objects, you will need to adjust the query by adding a marker parameter,
?marker=[value], to the end of the URL. The value for this parameter corresponds to the name of the last object returned in the previous query.- For example, if the <name> field for the last object in the previous query reads “testing.csv”, the new request URL would be https://olrc2.scholarsportal.info/v1/[project-identifier]/[container-name]/?marker=testing.csv
- This new query will return a listing of the next 10,000 objects that can be shared or downloaded as you need.
Using the swift client and CLI:
- Follow our instructions for downloading the Swift client, accessing the Swift CLI, and invoking the credentials file, if you have not done so before.
- To see the contents of a container, enter the following command:
swift list [container-name] - The following command will allow you to output the list to a file:
swift list [container-name] > [filename].[extension]- For example, if you would like a CSV file with the full listing for a container named “access”:
swift list access > access-listing.csv
- For example, if you would like a CSV file with the full listing for a container named “access”:
Hosting Static Sites
One use case for this project is static website hosting, where site files are stored in and served from the OLRC. This use case will require setting up a reverse proxy locally.
There are no rules for how you structure and organize your site files. You may, for instance, have one container correspond to one static site.
- Once your site files are ready, upload them to the OLRC. If you’re using the Swift CLI:
cd [directory-with-site-files]/

swift upload container-name . - To provide public access to the site, the container will need to be set to public. In Horizon, find the container and select the checkbox next to “Public Access.” When “Public Access” is enabled, the information panel will display an access link for your website.
- To ensure the index.html file resolves when you go to the root directory, set the web-index header with the following command in the Swift CLI:
swift post -m 'web-index:index.html' <container-name> - Set up your reverse proxy to point a URL to a container in the OLRC. This will need to be configured for each container that contains static site files.
Monitoring Storage Use
Storage usage can be determined at the container and project levels.
For a container, the information panel will report the total amount of data in that container at that point in time. If the total size appears to be lower than expected, this may be because of how the OLRC handles large objects.
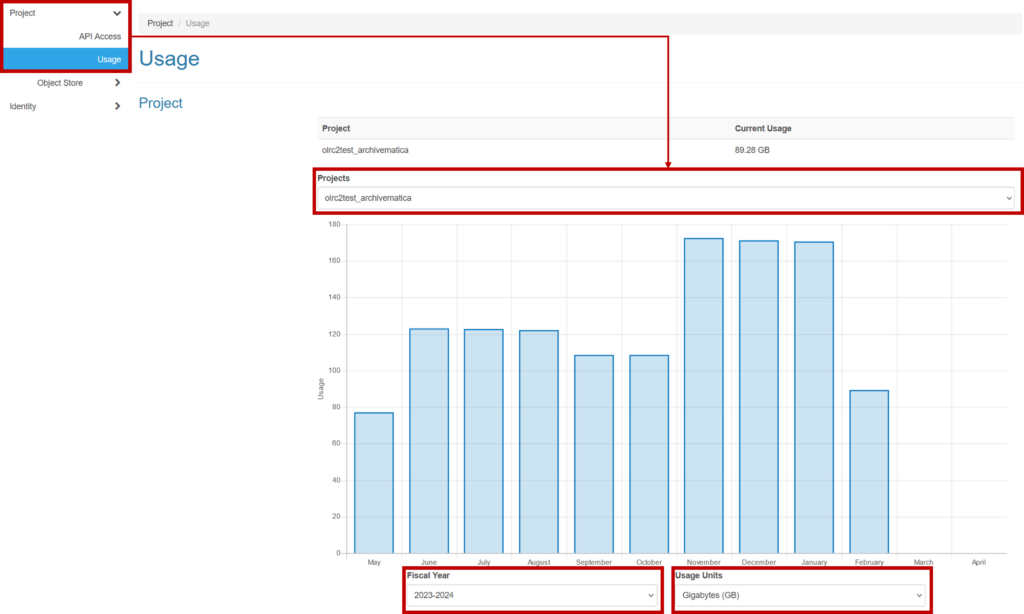
To understand usage at the project level, expand the “Project” tab in the left sidebar and select “Usage.” This page will present current storage use for the selected project as well as a bar chart of monthly usage for a given fiscal year. By default, the data will be reported in GB for your active project and the current fiscal year.
To view storage use for a different project, select the project name from the “Projects” drop-down. You will only be able to see usage statistics for projects that you have permission to access. Historical data can also be viewed by changing the period in the “Fiscal Year” menu below the bar chart. Depending on the volume of data that you are working with, you can also toggle between GB and TB with the “Usage Units” drop-down to the right of the “Fiscal Year” menu.